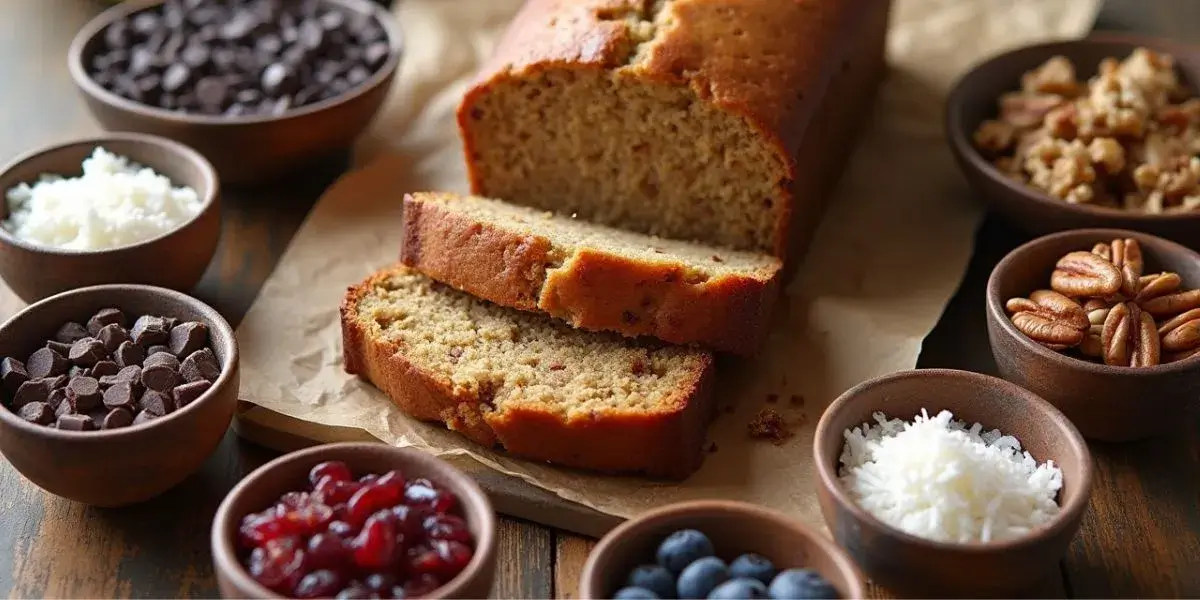
Raise your hand if you’ve ever stared into the fridge at 7 a.m., torn between “I should eat something nutritious” and “But I just want comfort food.” (Same.) This cottage cheese egg bake is the hug-in-a-dish solution. It’s fluffy, protein-packed, and sneaks in veggies so effortlessly, you’ll almost forget you’re being healthy. Plus, it reheats like a dream—hello, busy mornings!
Quick Links
What You'll Find in This Guide
Why This Recipe Works
Let’s talk cottage cheese. You’re missing out if you’ve only eaten it straight from the tub. When baked into eggs? Magic. It melts into this creamy, almost soufflé-like texture while bumping up the protein to keep you full for hours. And the best part? You can tweak it endlessly based on what’s lurking in your fridge.
Ingredients of egg bake with cottage cheese and spinach
Grocery List (AKA Simple, Real Ingredients)
No obscure health-food-store finds here. Just:
Olive oil – For sautéing. Butter works too if you’re feeling indulgent.
Onion + mushrooms – The savory backbone. Creminis add earthiness, but whites work fine.
Spinach – Wilts down to nothing, so don’t skimp! Frozen works in a pinch (just thaw and squeeze dry).
Eggs + cottage cheese – The dynamic protein duo. Small-curd 4% milkfat gives the richest texture.
Seasonings – Garlic powder, onion powder, salt, and pepper. Basic but brilliant.
Feta – That salty tang that makes every bite interesting.
Step-by-Step (With Chef’s Notes)
Sauté the veggies: Cook onions and mushrooms with a pinch of salt until golden. Pro tip: Let them sit undisturbed for a minute to caramelize. Adds flavor depth!
Wilt the spinach: Off heat, stir in spinach until it collapses. No soggy greens here—just vibrant flecks throughout.
Layer it up: Veggies go in a greased 9×13 dish. No fancy arranging; rustic is charming.
Whisk the eggs: Beat eggs, cottage cheese, and seasonings until mostly smooth (a few curds are fine!). For silky texture? Blend it.
Bake to perfection: 350°F for ~30 minutes. It’s done when the center jiggles slightly—it’ll set as it cools. Let it rest 15 minutes (patience rewards you with clean slices).
Pro Tweaks & Troubleshooting
Texture issues? Overmixing = dense bake. Stir just until combined.
Make-ahead: Assemble the night before; bake in the AM. Or freeze portions for instant breakfasts.
Veggie swaps: Try roasted red peppers or zucchini. Just precook watery veggies to avoid sogginess.
Serving Ideas (Beyond Breakfast)
Brunch MVP: Top with avocado and hot sauce. Serve with roasted potatoes.
Light dinner: Pair with a crisp salad and crusty bread.
On-the-go: Cut into squares and wrap in parchment—protein-packed “muffin” alternative.
Leftover Love
Stores beautifully!
Fridge: Up to 5 days. Reheat with a damp paper towel to prevent drying.
Freezer: Wrap slices individually. Thaw overnight, then warm at 300°F to revive the texture.
Final Thought This isn’t just a recipe—it’s your new kitchen wingman. Flexible, forgiving, and forever delicious. (And if you sneak a slice cold from the fridge at midnight? We won’t judge.)
spinach cottage cheese egg bake
Fluffy spinach cottage cheese egg bake—protein-packed, easy to make, and perfect for meal prep! Ready in 40 mins
Preheat the oven to 350°F (175°C). Lightly grease a 9×13-inch baking dish.
Sauté onions and mushrooms in olive oil over medium heat for 6–8 minutes until softened and golden.
Add spinach and stir until wilted. Turn off heat.
Spread the veggie mixture evenly into the baking dish.
Whisk eggs, cottage cheese, garlic powder, onion powder, salt, and pepper in a large bowl until mostly smooth (small curds are fine).
Pour the egg mixture over the veggies. Top with crumbled feta. Use a fork to gently stir and distribute ingredients evenly.
Bake for 30 minutes or until the center is set but still slightly jiggly.
Rest for 15 minutes before slicing. Enjoy warm, at room temp, or cold!
Notes
Substitutions & Add-Ins
Veggies: Swap in bell peppers, broccoli, or zucchini (pre-cooked to remove excess moisture).
Protein: Add pre-cooked sausage, ham, or bacon for an extra boost.
Cheese: Sub with shredded mozzarella, cheddar, or dairy-free options.
Storage
Refrigerator: Store in an airtight container for up to 5 days.
Freezer: Freeze individual portions wrapped tightly for up to 3 months.
Reheating: Microwave with a damp paper towel or bake at 300°F until warmed through.
Serving Suggestions
Top with avocado and hot sauce
Pair with a salad for a light lunch
Slice and wrap for grab-and-go breakfasts
Recipe Notes
Want a smoother texture? Blend the eggs and cottage cheese.
Don’t overmix the eggs or the cake can turn dense.
This dish is perfect for make-ahead: assemble the night before, bake in the morning.
Frequently Asked
What does adding cottage cheese to eggs do?
Adding cottage cheese to eggs boosts protein, creates a creamy texture, and keeps the bake fluffy. It’s an easy way to add moisture and richness without heavy cream. Bonus Pro Tip: Blending the cottage cheese first makes it smoother, ideal for picky eaters who dislike curds
Is spinach and cottage cheese healthy?
Yes! Spinach and cottage cheese are a powerhouse combo packed with protein, calcium, iron, and vitamins (A, K, C). Low-calorie but filling, they support muscle health, bones, and immunity. A perfect healthy pair!
How to make baked cottage cheese eggs?
Whisk 6 eggs + 1 cup cottage cheese, pour over sautéed veggies (spinach, onions, mushrooms), top with feta, and bake at 350°F for 30 mins. High-protein, fluffy, and perfect for meal prep! For a full recipe: See my Cozy Spinach Cottage Cheese Egg Bake above!
Which is healthier, yogurt or cottage cheese?
Both are healthy, but cottage cheese wins for protein (28g per cup vs. yogurt’s ~10g), while yogurt has more probiotics for gut health. Choose cottage cheese for muscle repair, or yogurt for digestion or enjoy both
Don’t miss out—follow us on social media for updates:
As the scent of autumn leaves fills the air and families gather, the heart of Thanksgiving beats stronger. Imagine adding a twist to your traditional feast, something that warms the soul and delights the senses. This Garlic Bread Stuffing recipe isn’t just a dish; it’s a hug in a bowl, a symphony of flavors that evokes memories of laughter and togetherness. Let’s embark on this culinary journey, where each ingredient tells a story of comfort, love, and the joy of sharing a meal that truly nourishes.
garlic bread stuffed with chickenQUICK LINKS
What You'll Find in This Guide
What makes the garlic bread stuffing recipe the Best?
What truly sets this garlic bread stuffing apart is its innovative approach to a classic dish, transforming it into an unforgettable Thanksgiving centerpiece. Unlike traditional stuffings that often rely on standard bread cubes, this recipe elevates the texture and flavor profile by using garlic bread as its base. The inherent garlicky, buttery notes of the bread infuse every bite with a rich, savory depth, eliminating the need for excessive seasoning.
This unique foundation, combined with a medley of fresh herbs and vegetables, creates a harmonious blend of flavors that is both comforting and exciting. The result is a stuffing that is incredibly delicious and remarkably easy to prepare, making it the perfect addition to any Thanksgiving table, promising to captivate taste buds and leave guests craving more.
Key Features of Great Staffing
So, what separates a good stuffing from the best stuffing recipe? Here are a few must-have elements:
Flavor Balance A great stuffing combines savory, aromatic, and herby flavors seamlessly. The earthy tones of sage and thyme should complement the richness of the butter and broth, with a hint of sweetness from add-ins like dried cranberries or caramelized onions.
Texture Perfection The texture of the stuffing is everything. It should be moist and tender but not overly wet or mushy. At the same time, the perfectly baked stuffing has a golden, slightly crispy top layer that adds a delightful contrast to the soft interior.
Customizability One of the best things about stuffing is its versatility. Whether you prefer a classic bread-based version, a gluten-free alternative, or a bold twist with international flavors, stuffing is a dish you can truly make your own.
Creating the best stuffing recipe doesn’t have to be complicated. It’s about finding the right balance of ingredients and techniques that suit your tastes and traditions. Let’s explore those essential elements step by step in the sections ahead.
Ingredients for the garlic bread stuffing recipe
Here’s a quick reference for the essential ingredients:
Ingredient
Quantity
Notes
Stale bread cubes
8 cups
Sourdough or rustic bread
Butter
½ cup
Unsalted for better control of seasoning
Celery
1 cup
Finely chopped
Onion
1 cup
Finely chopped
Chicken or turkey broth
2 cups
Adjust based on bread type
Fresh sage and thyme
1 tbsp each
Or 1 tsp each of dried herbs
With these ingredients in hand, you’re ready to create rich, flavorful, and unforgettable stuffing. Whether you stick to the essentials or get creative with add-ins, the key is balancing flavors and textures for a dish that everyone will love.
Build-Your-Own Stuffing Recipe
The best stuffing recipe isn’t just about following a basic formula—it’s about making it your own. The beauty of stuffing lies in its versatility, allowing you to tweak ingredients, flavors, and textures to match your personal preferences. Whether you’re sticking to traditions or adding modern twists, there are endless ways to customize your Thanksgiving stuffing. Let’s dive into how you can make this dish truly your own, ensuring it stands out on your holiday table.
Flavor Variations
One of the easiest ways to customize your stuffing is by incorporating different flavor profiles. The beauty of this dish is that it can take on regional, international, or even personal flavor influences. Here’s how you can spice things up:
Regional Styles: Each part of the U.S. has its take on stuffing. In the South, cornbread stuffing is king, with a slightly sweet and savory flavor. In New England, stuffing might include seafood, offering a delicate, briny bite that’s perfect for a coastal twist.
International Twists: Want to add something exotic? Try incorporating Italian pancetta or prosciutto for a savory, salty punch. You can also experiment with Indian spices like cumin, coriander, and turmeric to give your stuffing a warm, aromatic flavor that pairs wonderfully with roasted turkey.
Experimenting with different flavors not only makes your stuffing unique but also adds a personal touch that reflects your taste and creativity.
Dietary Modifications
Many Thanksgiving guests come with specific dietary needs, so customizing your stuffing to be more inclusive is a great way to ensure everyone feels included. Here are some popular options:
Gluten-Free Swaps: Traditional bread-based stuffing may not work for those with gluten sensitivities, but it’s easy to adapt! Simply swap the bread for gluten-free bread or even rice for a completely different texture.
Vegetarian and Vegan Adaptations: To make your stuffing vegetarian or vegan, skip the sausage or meat-based broth and use vegetable broth instead. You can also add more veggies like mushrooms, sweet potatoes, or butternut squash to give it a hearty substance.
The flexibility in ingredient swaps ensures that your stuffing can cater to various dietary restrictions while still maintaining all the delicious flavors.
Customizing your stuffing doesn’t have to be complicated. Whether you’re adjusting flavors to suit your preferences or accommodating dietary needs, the key is to experiment and have fun. With the right ingredients and a little creativity, you can make a stuffing recipe that will be remembered for years to come!
By purchasing through this link, I may earn a small commission at no extra cost to you, helping to support this site
Stuffing Gone Wrong? Here’s How to Fix It
When it comes to Thanksgiving, few dishes are as essential as stuffing. However, creating the best stuffing recipe can be tricky, and there are a few common mistakes that can prevent your stuffing from reaching its full potential. Whether you’re a stuffing novice or a seasoned pro, knowing how to avoid these pitfalls will ensure your stuffing is a crowd-pleaser every time.
Too Dry:
The stuffing might seem lacking in moisture.
Remedy this by drizzling in warm broth and a bit of olive oil or melted butter to bring a pleasing, moist balance.
Too Moist:
Excess liquid can make the stuffing soggy and heavy.
Counteract this by folding in extra toasted garlic bread or crispy croutons that help absorb the surplus moisture.
Underseasoned:
A bland base can be disappointing if it lacks the pop of flavor.
Brighten things up with an extra pinch of salt, fresh cracked pepper, or even a splash of lemon juice to enhance the overall taste.
Lack of Crunch:
Sometimes, the texture may be too uniform, missing that delightful crunch.
Consider adding toasted nuts or even a handful of crispy fried onions to introduce an enjoyable contrast in texture.
Overwhelming Flavors:
If one ingredient, such as garlic, overpowers the dish, it can throw off the balance.
Soften the intensity by mixing in neutral bread cubes or a mild vegetable like diced celery, allowing the flavors to harmonize beautifully.
Serving and Storing Garlic Bread Stuffing Recipe
After hours of preparation and baking, your stuffing is finally ready to shine on your Thanksgiving table. But how do you serve it at its best and store it properly to maintain that mouthwatering flavor? Whether you’re serving your stuffing immediately or planning for leftovers, here’s how to get it just right.
Best Ways to Serve garlic bread stuffing recipe Hot
Stuffing tastes best when it’s served fresh and hot, straight from the oven. But how do you make sure it stays warm without drying out? Here are some tips:
Serve Immediately After Baking: Once your stuffing has reached the perfect golden-brown top and moist interior, serve it right away. The texture and flavor are at their peak, and it’s the best time to enjoy it.
Keep It Warm: If you need to keep your stuffing warm for a while, cover it loosely with foil to trap the heat while preventing it from becoming soggy. A warming tray or a slow cooker on the “keep warm” setting can also help maintain that delicious, fresh-from-the-oven texture without overcooking it.
Serve in Style: Consider serving your stuffing directly from a beautiful casserole dish or cast-iron skillet for a rustic touch. It not only keeps the stuffing warm longer but also adds to the aesthetic of your holiday spread. Garnishing with fresh herbs like parsley or sage can elevate the presentation and bring extra flavor.
Storage Tips: How to Refrigerate and Reheat Without Losing Flavor
Leftovers are one of the best parts of Thanksgiving! But to keep your stuffing tasting just as good the next day, proper storage and reheating are crucial.
Storage in the Fridge: Allow the stuffing to cool to room temperature before transferring it to an airtight container. You can keep it fresh in the refrigerator for three to four days. This will prevent the stuffing from drying out or spoiling too soon.
Reheating Tips: When you’re ready to enjoy your leftovers, preheat your oven to 350°F (175°C). Cover the stuffing with foil and bake for about 20-30 minutes. This will heat it through while keeping it moist. If it seems dry, add a bit of broth (chicken or vegetable) to restore some moisture. Stir occasionally for reheating.
Microwave Option: If you’re in a hurry, you can microwave individual portions of stuffing. Just be sure to cover the dish with a damp paper towel to help maintain moisture and avoid drying out.
Freezing Leftovers: How to Do It Right
Have more stuffing than you can finish? Freezing is a great way to preserve it for future meals. Here’s how to do it without sacrificing flavor or texture:
Cool Completely: Allow the stuffing to cool fully before freezing. This will prevent condensation from forming inside the container, which could make the stuffing soggy.
Use Airtight Containers or Freezer Bags: For best results, store your stuffing in airtight freezer bags or containers. If using freezer bags, try to remove as much air as possible before sealing to prevent freezer burn.
Label and Date: Don’t forget to label the bags or containers with the date so you know when it was frozen. Stuffing can be stored in the freezer for up to 1-2 months.
Reheating Frozen Stuffing: To reheat, place the frozen stuffing in the fridge overnight to thaw. Once thawed, follow the same reheating instructions as fresh leftovers, adding a bit of broth if needed. Alternatively, you can reheat from frozen by baking at a lower temperature (about 300°F or 150°C) for a longer time (around 45 minutes to an hour).
With the right storage and reheating methods, your best stuffing recipe can be enjoyed long after Thanksgiving dinner. Whether you’re serving it hot straight from the oven or reheating leftovers, these tips will ensure your stuffing stays moist, flavorful, and ready to impress. Now you’re all set to make your Thanksgiving stuffing the star of the meal, not just on the big day but for days to come!
This garlic bread stuffing recipe reimagines a classic holiday staple by combining crispy garlic bread cubes with aromatic garlic, red onions, and fresh herbs. The result is a comforting, flavorful side dish that brings a unique twist to your Thanksgiving table, with room for creative variations using walnuts, cranberries, or Parmesan cheese.
– 1 cup chicken brothor vegetable broth for a vegetarian version
– 1 cup fresh parsleychopped
– Salt and pepperto taste
Optional Add-Ons:
– 1/2 cup celeryfinely diced
– 1/2 cup walnuts or pecanstoasted and chopped
– 1/2 cup dried cranberries
– 1/4 cup grated Parmesan cheese
Get Recipe Ingredients
Instructions
Preheat your oven to 350°F (175°C). In a large mixing bowl, gently toss the garlic bread cubes with the melted butter until they are evenly coated.
Heat a skillet over medium heat and sauté the minced garlic and chopped red onion (add celery at this stage if using) for about 5 minutes until softened and aromatic.
Pour the broth into the skillet, stirring to combine the flavors, then gradually mix this liquid into the bowl with the bread cubes. Season with salt and pepper to evenly moisten the cubes.
Fold in the fresh parsley along with any optional add-ons—walnuts or pecans, dried cranberries, and Parmesan cheese—to create a balanced blend of flavors and textures.
Transfer the mixture into a greased baking dish, cover with foil, and bake for 25 minutes. Remove the foil and bake for an additional 5-10 minutes until the top becomes golden and crisp.
Remove from the oven and let the stuffing rest for 5 minutes before serving warm.
Notes
For a vegetarian version, simply opt for vegetable broth. This garlic bread stuffing recipe is ideal for Thanksgiving or any festive occasion where you want to serve a crowd-pleasing, comforting side dish.
FAQs: Get the Answers You Need
How to make garlic bread stuffing?
To make garlic bread stuffing, cube garlic bread and toast it lightly. Sauté onions, celery, and garlic in butter. Mix with the bread cubes, add chicken broth, eggs, and seasonings like thyme and parsley. Bake at 350°F (175°C) until golden and crisp. Enjoy!
What are the ingredients for stuffing?
The basic ingredients for stuffing include: Bread (cubed and dried) – white, sourdough, or cornbread Butter – for richness and flavor Broth – chicken, turkey, or vegetable for moisture Onion & Celery – classic aromatics for depth Garlic – enhances flavor (optional) Eggs – help bind the stuffing (optional) Herbs & Spices – sage, thyme, rosemary, parsley, salt, and pepper Extras (Optional) – sausage, mushrooms, nuts, dried fruit, or cheese
How to make garlic and herb stuffing?
To make garlic and herb stuffing, follow these simple steps: Ingredients: 6 cups cubed bread (dried or toasted) 4 tbsp butter 1 small onion, diced 2 celery stalks, diced 4 cloves garlic, minced 1 ½ cups chicken or vegetable broth 1 egg (optional, for binding) 1 tsp dried sage 1 tsp dried thyme 1 tsp dried rosemary ½ tsp salt & ¼ tsp black pepper 2 tbsp fresh parsley, chopped Instructions: Preheat the oven to 350°F (175°C) and grease a baking dish. In a pan, melt butter and sauté onion, celery, and garlic until soft. Add sage, thyme, rosemary, salt, and pepper; stir for 1 minute. In a bowl, mix bread cubes with the sautéed mixture. Pour in broth (and whisked egg if using), stirring until moistened. Transfer to the baking dish and bake for 30-35 minutes until golden. Garnish with fresh parsley, and serve warm!
Can you make stuffing from scratch?
Yes! You can make stuffing from scratch with simple ingredients. How to Make Stuffing from Scratch: Dry the Bread: Cube and toast bread or let it sit out overnight. Sauté Aromatics: Cook onions, celery, and garlic in butter. Season it: Add herbs like sage, thyme, and rosemary. Moisten: Mix with broth and whisked eggs (optional for binding). Bake: Transfer to a greased dish and bake at 350°F (175°C) for 30-35 minutes until golden.
How to make a good bread stuffing?
To make good bread stuffing: Dry the bread by cubing and toasting it. Sauté onion, celery, and garlic in butter. Mix the bread with the sautéed veggies, herbs, and broth (add an egg for binding, if desired). Bake at 350°F (175°C) for 30-35 minutes, initially covering and then uncovering for a crispy top.
Can I use any bread for stuffing?
Yes, you can use any bread for stuffing! Popular choices include: White bread (classic and soft) Sourdough (adds a tangy flavor) French bread (sturdy texture) Whole wheat (for a heartier taste) Cornbread (adds sweetness) Just make sure the bread is stale or toasted to absorb the broth without becoming soggy.
Garlic bread stuffing recipe
Our garlic bread stuffing recipe redefines the holiday feast by offering a unique twist on classic stuffing. This innovative dish blends crisp garlic bread with savory herbs to create a memorable alternative to traditional recipes. Elevate your Thanksgiving table by embracing this delightful fusion of flavors.
Discover a perfect holiday side dish that promises both comfort and excitement with this garlic bread stuffing recipe. Impress your guests with this innovative alternative and transform your meal into an unforgettable experience. Don’t hesitate—try this recipe today and add a burst of culinary creativity to your celebration.
Don’t miss out—follow us on social media for updates:
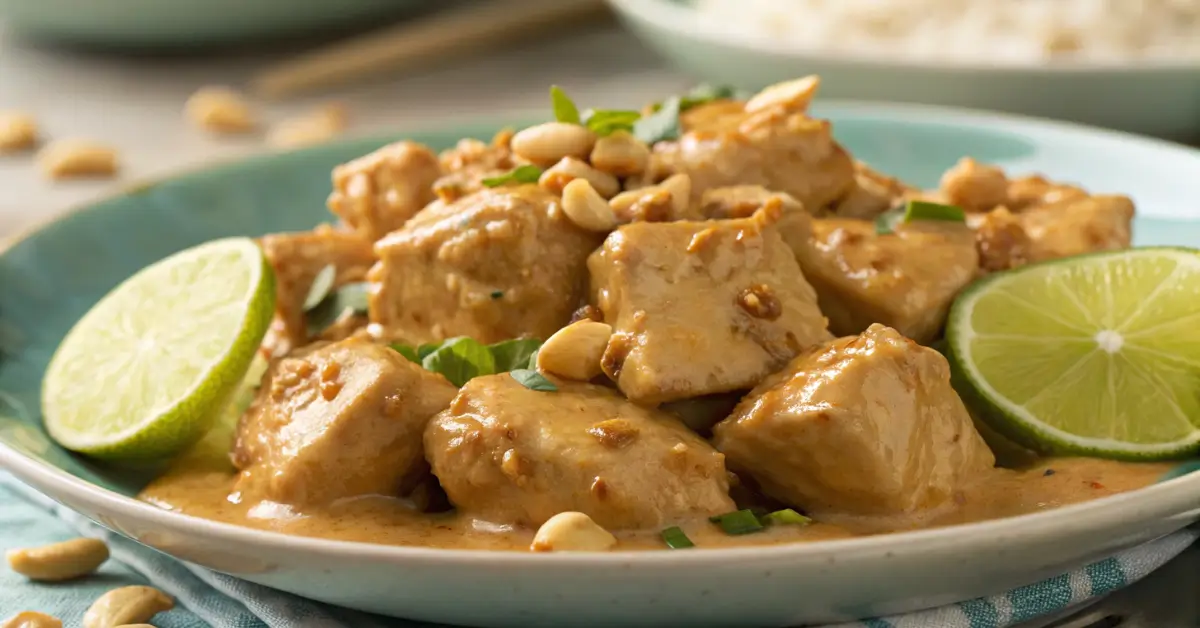
Discover an explosion of flavors with this unique take on peanut lime chicken. This dish—often called chicken with coconut lime peanut sauce—combines the tang of fresh lime, the creaminess of coconut milk, and the warm, nutty allure of peanut butter into one unforgettable meal. Whether you call it delish creamy peanut lime chicken or simply creamy peanut lime chicken, this recipe promises a delightful fusion of tropical and savory notes that will elevate your dinner table.
QUICK LINKS
What You'll Find in This Guide
Chicken with Coconut Lime Peanut Sauce – Inspired by Asian and Tropical Cuisines
Inspired by the vibrant culinary traditions of Southeast Asia, this dish brings together ingredients that play harmoniously on the palate. The idea for this chicken with coconut lime peanut sauce evolved from a desire to create a meal that balances bright acidity with rich, mellow creaminess. Using coconut milk, lime, and peanuts captures the essence of tropical cuisine while delivering a comforting, hearty flavor profile. It’s an ideal recipe for those who appreciate a delicate balance between zesty and creamy textures in their peanut lime chicken.
Ingredients Overview
Ingredient
Amount
Notes
Chicken Breast
1.5 lbs
Cut into bite-size cubes
Coconut Oil or Butter
2 tbsp
For sautéing
Diced Onion
1 medium
Minced Garlic
3 cloves
Asparagus
1 bunch
Trimmed and cut into pieces (optional)
Fresh Lime Juice
Juice of 2–3 limes
Adjust for extra tang if desired
Cayenne Pepper
1/4 tsp
Use more if you prefer extra heat
Red Curry Paste
1 tbsp
Cinnamon
1/4 tsp
Stevia or Sugar
1 tsp
Adjust sweetness to your taste
Full-Fat Coconut Milk
14 oz can
For a creamy texture
Fish Sauce
1 tbsp
Peanut Butter
1/2 cup
Smooth variety recommended
Toasted Sesame Oil
1 tsp
Soy Sauce
1 tbsp
Feel free to use this table as a reference for gathering your ingredients!
How to Prepare Chicken with Coconut Lime Peanut Sauce
Before recreating your chicken with coconut lime peanut sauce, preparation is key. Begin by carefully trimming and cutting the chicken into bite-size pieces. Marinate the chicken with a squeeze of lime juice, a pinch of salt, and freshly ground pepper, allowing it to soak in the citrus essence. This step is crucial as it ensures that each piece of chicken absorbs the tangy flavors before they mingle with the rich, nutty sauce.
The marinade also serves to tenderize the chicken, ensuring that when it’s cooked, it remains juicy and succulent. While marinating, keep in mind that the balance of flavors is vital: the acidity from the lime should complement, not overpower, the natural sweetness of the coconut milk and peanut butter. Letting the chicken rest in the marinade will heighten the overall dish, setting a strong foundation for the final flavor profile.
Best Side Dishes for Chicken with Coconut Lime Peanut Sauce
Presentation plays a significant role in making this dish even more enticing. When serving your creamy peanut lime chicken, consider pairing it with a side that can soak up the luscious sauce. Options like noodles, fragrant jasmine rice, steamed vegetables, or even rice noodles work wonderfully. For an added touch, garnish the dish with chopped fresh cilantro, a few extra lime wedges, and a sprinkling of crushed peanuts to enhance both texture and flavor visually.
A rustic plating style with vibrant colors can highlight the tropical nature of the coconut-lime peanut sauce. Arrange the chicken pieces artistically on a dinner plate, drizzle generously with the creamy sauce, and finish with the garnishes for a presentation that’s as appealing as it is delicious.
Nutritional Benefits of Delish Creamy Peanut Lime Chicken
1. Chicken Breast:
Lean Protein Source: Chicken breast is an excellent source of lean protein, which is essential for muscle growth, repair, and overall body function. It provides the building blocks for enzymes, hormones, and other important molecules.
Low in Fat: Skinless chicken breast is low in saturated fat, making it a heart-healthy protein option.
Vitamins and Minerals: Chicken contains important vitamins such as B6 and B12, which are crucial for energy metabolism and red blood cell formation, as well as minerals like phosphorus and selenium that support bone health and immune function.
2. Coconut Milk:
Healthy Fats: Coconut milk contains medium-chain triglycerides (MCTs), which can provide a quick source of energy and may support weight management. MCTs are metabolized differently from other fats, potentially aiding in fat loss.
Vitamins and Minerals: It is rich in manganese, which plays a role in bone health and metabolism, and contains some iron, potassium, and magnesium.
3. Peanut Butter:
Nutrient-Dense: Peanut butter is a good source of healthy fats, protein, and fiber, making it a filling addition that can help keep you satisfied.
Heart Health: It contains monounsaturated fats, which can help lower bad cholesterol levels and reduce the risk of heart disease.
Vitamins and Minerals: Peanut butter is high in vitamin E, magnesium, and potassium, contributing to overall health and well-being.
4. Fresh Lime Juice:
High in Vitamin C: Lime juice is an excellent source of vitamin C, which is essential for immune function, skin health, and antioxidant protection.
Hydration: The high water content in lime juice can contribute to hydration and support digestion.
5. Garlic and Onion:
Antioxidant Properties: Both garlic and onion contain antioxidants that may help reduce inflammation and lower the risk of chronic diseases.
Heart Health: Garlic has been shown to support cardiovascular health by improving blood circulation and lowering blood pressure.
6. Additional Ingredients:
Cayenne Pepper: Contains capsaicin, which may boost metabolism and promote fat burning.
Fish Sauce: Provides a source of umami flavor and can contribute to overall mineral intake, including iodine.
Cinnamon: Offers potential anti-inflammatory benefits and may help regulate blood sugar levels.
Pro Tips for Enhancing the Flavor of Chicken with Coconut Lime Peanut Sauce and Troubleshooting
Flexibility is at the heart of this recipe. For instance, you can experiment with the intensity of flavors by adjusting the amount of lime juice or peanut butter to suit your taste. Some variations include:
Add a splash of soy sauce or fish sauce for a deeper umami note.
Incorporate vegetables such as bell peppers, carrots, or snap peas to add color and crunch.
Using crushed peanuts in place of or in addition to peanut butter to vary the texture of the sauce.
When troubleshooting, keep these points in mind:
If the sauce appears too runny, a gentle simmer can help thicken it without losing its creaminess.
If the flavor seems one-dimensional, consider a sprinkle of fresh herbs or an extra squeeze of lime to revive the balance.
These tips ensure that your delish creamy peanut lime chicken not only comes out perfectly every time but also leaves room for creative variations that reflect your culinary style.
Chicken with Coconut-Lime Peanut Sauce recipe
Jasper wellspring
Savor our Chicken with Coconut-Lime Peanut Sauce recipe! Tender chicken in a creamy, tangy sauce, perfect over rice or noodles. A delicious tropical delight
1bunch of asparagustrimmed and cut into pieces (optional)
For the Sauce:
Juice of 2–3 fresh limesadjust for extra tang if desired
1/4tspcayenne pepperuse more for extra heat
1tbspred curry paste
1/4tspcinnamon
1tspstevia or sugaradjust sweetness to your taste
14ozcan of full-fat coconut milk
1tbspfish sauce
1/2cuppeanut buttersmooth variety recommended
1tsptoasted sesame oil
1tbspsoy sauce
Get Recipe Ingredients
Instructions
In a bowl, combine all the sauce ingredients—lime juice, cayenne pepper, red curry paste, cinnamon, stevia (or sugar), coconut milk, fish sauce, peanut butter, toasted sesame oil, and soy sauce. Whisk thoroughly until the mixture is smooth and uniformly creamy. If the consistency is too thick, thin it out with a small splash of water or additional coconut milk. Set the sauce aside.
Heat the coconut oil (or butter) in a large skillet over medium heat. Add the diced onion and minced garlic, and sauté until the onions become soft and translucent.
Increase the heat slightly and add the cubed chicken to the skillet. Sauté until the chicken pieces are golden on all sides and nearly cooked through.
If using, add the asparagus into the skillet. You can lightly cook them for added tenderness or reserve them to be added raw later for a crisp texture.
Reduce the heat to low and gently stir in the prepared coconut lime peanut sauce. Allow the sauce to warm slowly, ensuring it does not boil vigorously so as to maintain its creamy integrity. Taste and adjust seasoning with extra lime juice or a pinch of salt if necessary.
Serve the dish immediately, spooning generous portions over your choice of jasmine rice, noodles, or even a bed of steamed greens. Garnish with extra lime wedges or a sprinkle of fresh herbs, if desired.
Notes
• For a spicier version, increase the cayenne pepper or add a dash of chili oil. • The asparagus is optional—feel free to incorporate other vegetables like bell peppers or snap peas according to your preference. • This dish is equally wonderful served warm or at room temperature, making it a versatile option for any meal.Enjoy this delicious twist on peanut lime chicken, a perfect blend of zest and creaminess that celebrates the best of Asian-inspired flavors!
Frequently Asked Questions (FAQs)
What does peanut sauce go with?
Peanut sauce pairs well with grilled chicken, noodles, rice, vegetables, spring rolls, and satay. It also works as a dip or salad dressing
Can I prepare the ingredients in advance?
Yes! You can prep the ingredients in advance by chopping the chicken, mixing the marinade, and making the peanut sauce. Store them separately in the fridge for up to 2 days.
How do I store leftovers OF the Chicken with Coconut Lime Peanut Sauce recipe?
Store leftovers in an airtight container in the fridge for up to 3 days. Reheat gently on the stove or in the microwave, adding a splash of coconut milk if needed
What is the difference between Satay Sauce and peanut sauce?
Satay sauce is a type of peanut sauce, but the key difference is in the flavor and usage. Peanut sauce is a general term for sauces made with peanuts, often used for dipping, drizzling, or as a marinade. Satay sauce, specifically, is a spiced peanut sauce commonly served with grilled skewers (satay), usually containing coconut milk, soy sauce, and spices like turmeric for extra depth.
What flavors go well with peanut sauce?
Peanut sauce pairs well with flavors like lime, garlic, ginger, soy sauce, chili, honey, coconut, cilantro, and sesame. These ingredients enhance its nutty, savory, and slightly sweet taste!
Overall, Chicken with Coconut Lime Peanut Sauce combines protein, healthy fats, and a variety of vitamins and minerals to create a nutritious meal. The balance of flavors and nutrients makes it a satisfying dish that can support a healthy diet while indulging in delightful textures and tastes. Enjoying this dish can contribute positively to your overall health, making it a great choice for any meal.
Don’t miss out—follow us on social media for updates:
Baked scrambled eggs are a blank canvas for your breakfast creativity! Add your favorite cheeses, vegetables, and meats to create a custom dish that everyone will love. This versatile recipe is perfect for brunch, meal prep, or a simple weekday breakfast.
Table of Contents
What You'll Find in This Guide
Why Choose Baked Scrambled Eggs for Breakfast?
There are several compelling reasons to ditch the skillet and embrace the oven for your scrambled eggs. Here’s why baking might just become your new favorite method:
Baking is ideal when you’re feeding a large group or prepping breakfast for the week. You can easily scale the recipe up or down to suit your needs, and the baked eggs are easy to cut into squares and serve. No more struggling to make individual batches of scrambled eggs! complete guide on how to prepare them, including tips, ingredient adjustments, and serving ideas.
Effortless Cooking:
Baking offers a truly hands-off approach. Unlike stovetop scrambling, you don’t need to stand and stir constantly. Simply whisk, pour, and bake! This frees you up to prepare other breakfast items or simply relax while your eggs cook themselves.
Unbeatable Texture:
The oven’s gentle heat creates a uniquely tender and fluffy texture that’s hard to achieve on the stovetop. The eggs bake evenly, resulting in a creamy, almost custard-like consistency that melts in your mouth. Say goodbye to dry, rubbery scrambled eggs!
Perfect for a Crowd:
Baking is ideal when you’re feeding a large group or prepping breakfast for the week. You can easily scale the recipe up or down to suit your needs, and the baked eggs are easy to cut into squares and serve. No more struggling to make individual batches of scrambled eggs!
Unleash Your Creativity: Flavorful Additions for Baked Scrambled Eggs
One of the best things about baked scrambled eggs for breakfast is their versatility. They’re a blank canvas for your culinary imagination! Here are a few suggestions to help you begin:
Add herbs and spices to taste.
Cheesy Goodness:
Cheddar, mozzarella, Gruyere, and feta are all fantastic choices. Experiment with different combinations to find your favorite cheesy flavor.
Add about 1/2 to 1 cup of shredded cheese per 6 eggs, adjusting to your preference.
Vegetable Medley:
Diced bell peppers, onions, spinach, mushrooms, and tomatoes add color, flavor, and nutrients.
Consider sautéing heartier vegetables like onions and mushrooms before adding them to the egg mixture.
Meaty Delights:
Cooked and crumbled bacon, sausage, ham, or chorizo add a savory and satisfying element.
Use about 1/2 to 1 cup of cooked meat per 6 eggs.
Herbs and Spices:
Fresh chives, parsley, dill, or oregano add a burst of freshness. Seasonings like paprika, garlic powder, or onion powder can boost flavor profiles.
To ensure your baked scrambled eggs turn out perfectly every time, keep these helpful tips in mind:
Avoid Overbaking:
The key to tender, creamy baked scrambled eggs is to avoid overbaking them. They should be firm around the edges but slightly jiggly in the center when taken out of the oven, as they will continue to cook while resting.
Grease Generously:
Thoroughly greasing your baking dish is crucial to prevent the eggs from sticking and ensure easy removal. Use butter or cooking spray, and make sure to coat the entire surface of the dish.
Adapt Baking Time:
Since oven temperatures may vary, keep an eye on your dish and adjust the baking time if necessary. Start checking the eggs a few minutes before the recommended time and continue baking until they reach your desired consistency.
Rest Before Serving:
Allow the baked scrambled eggs to rest for a few minutes before cutting and serving. This allows them to set further and makes them easier to slice.
Dairy-Free Options:
For a dairy-free version, substitute almond milk, soy milk, or coconut milk for the milk or cream in the recipe.
Elevating Your Oven Scrambled Eggs RecipeExperience: Serving Ideas
Baked scrambled eggs are delicious on their own, but here are some ways to make them even more enjoyable:
Classic Pairings:
Serve them alongside toasted bread, English muffins, or bagels for a complete breakfast.
Fruity Companions:
Fresh fruit, such as berries, melon, or sliced bananas, provides a refreshing contrast to the richness of the eggs.
Avocado Toast Upgrade:
Top slices of avocado toast with baked scrambled eggs for a satisfying and healthy meal.
Side Salad Addition:
A simple side salad adds a touch of lightness and freshness to the breakfast.
Brunch Buffet Star:
Baked scrambled eggs are a fantastic addition to any brunch buffet. They can be made ahead of time and kept warm until serving.
Meal Prep Magic:
These eggs are perfect for meal prepping. Store individual portions in the refrigerator and reheat them for a quick and easy breakfast throughout the week.
Reheating Instructions:
Reheat leftover baked scrambled eggs in the microwave or oven until warmed through.
Nutrition facts of scrambled eggs
Here’s a breakdown of the nutritional facts for scrambled eggs. Please remember that these values can vary based on the size of the egg and any added ingredients (like milk, butter, cheese, etc.). The following is based on one large egg scrambled without additional ingredients:
Approximate Nutritional Profile:
Calories: Around 91
Protein: About 6.3 grams
Fat: Approximately 6.76 grams
Saturated Fat: Roughly 2 grams
Cholesterol: Around 213 mg
Sodium: About 83 mg
Carbohydrates: Less than 1 gram
Key Vitamins and Minerals:
Eggs provide a rich variety of vitamins and minerals, such as:
Vitamin D: Crucial for maintaining strong bones and supporting the immune system.
Vitamin B12: This is Vital for proper nerve function and the formation of red blood cells.
Riboflavin (Vitamin B2): Helps convert food into energy.
Folate (Vitamin B9): Essential for healthy cell growth and development.
Selenium: A powerful antioxidant that helps protect the body from cell damage.
Choline: Important for brain health.
Important Points to Consider:
Cholesterol: Eggs are relatively high in cholesterol. However, current dietary guidelines suggest that for most people, dietary cholesterol has less impact on blood cholesterol levels than previously thought.
Added Ingredients: The nutritional content can change significantly when you add ingredients like milk, cheese, butter, or salt.
Preparation Method: The way you cook eggs can influence their nutritional value.. Cooking with oil or butter will increase the fat content.
If you have specific dietary concerns or health conditions, consulting with a healthcare professional or a registered dietitian for personalized advice is always a good idea.
Oven Baked Scrambled Eggs for Breakfas
Jasper wellspring
Enjoy perfectly cooked, fluffy scrambled eggs without the stovetop hassle! This baked recipe is easy, customizable, and great for crowds.
Grease Dish: Grease a 9×13 inch baking dish (or similar size) with butter or cooking spray.
Whisk Eggs: In a large bowl, whisk together the eggs, milk or cream, salt, and pepper until well combined.
Add Add-Ins (Optional): If desired, stir in your chosen add-ins (cheese, cooked meats, vegetables, herbs) into the egg mixture.
Pour into Dish: Pour the egg mixture into the prepared baking dish.
Bake: Bake for 20-25 minutes, or until the eggs are set but still slightly jiggly in the center.
Rest: Let the eggs rest for a few minutes before serving.
Serve: Cut into squares and serve immediately.
Notes
Add-In Ideas: Consider adding shredded cheddar cheese, cooked and crumbled bacon, diced bell peppers, chopped spinach, or a sprinkle of fresh herbs.
Baking Time: Baking time may vary depending on your oven. Check the eggs after 20 minutes and adjust accordingly.
Dairy-Free: Use almond milk or another dairy-free alternative for a dairy-free version.
Storage: Leftovers can be stored in the refrigerator for up to 3 days.
Frequently Asked Questions (FAQ)
Can you cook scrambled eggs in the oven?
Yes, you can cook scrambled eggs in the oven! Here’s a simple method: Preheat the oven to 350°F (175°C). Whisk the eggs with a bit of milk or cream, salt, and pepper. Pour the egg mixture into a greased baking dish. Bake for about 15-20 minutes, stirring halfway through to ensure even cooking. Once set, remove from the oven and serve.
scrambled egg and baked beans a healthy breakfast?
Yes, scrambled eggs and baked beans can be a healthy breakfast. Scrambled eggs provide protein and vitamins, while baked beans offer fiber and protein. To keep it healthy, opt for low-sugar beans and use less butter in the eggs.
How do you bake eggs instead of frying?
To bake eggs instead of frying: Preheat the oven to 350°F (175°C). Grease a baking dish or individual ramekins with butter or oil. Crack eggs into the dish, making sure they don’t overlap. Season with salt, pepper, and any other desired seasonings. Bake for about 10-15 minutes, or until the whites are set but the yolk remains runny. For firmer yolks, bake a bit longer. You can also add toppings like cheese, herbs, or vegetables before baking.
Do chefs add milk to scrambled eggs?
Yes, many chefs add milk (or cream) to scrambled eggs to make them creamier and softer. The milk helps create a smooth texture by preventing the eggs from becoming too dry or rubbery. However, some chefs prefer to skip the milk for a richer, more intense egg flavor, relying solely on butter or oil for moisture. It ultimately depends on personal preference and the desired consistency.
From simple additions to elaborate flavor combinations, Baked Scrambled Eggs for Breakfast are endlessly adaptable. So get creative, experiment with your favorite ingredients, and enjoy!
Don’t miss out—follow us on social media for updates:
Are you tired of the same old boring breakfast routine? Are your taste buds begging for something, anything, to break the monotony? The solution is simpler (and more delicious) than you think. Ditch the sugary cereals and bland toast and embrace the creamy revolution. Scrambled egg toast with cream cheese answers your breakfast prayers – a quick, easy, and utterly satisfying way to start your day.
Quick links
What You'll Find in This Guide
What makes scrambled egg toast with cream cheese Special?
This isn’t just another breakfast recipe. Scrambled egg toast with cream cheese is special for a few reasons. It’s all about the simple things that make a big difference.
The Magic of Cream Cheese:
Cream cheese makes this recipe amazing. It adds a creamy and tangy flavor to the eggs. The cream cheese melts into the warm eggs, making them extra rich. It’s a simple addition that takes scrambled eggs to the next level.
Simplicity and Speed:
This recipe is quick and easy to make. You don’t need a lot of ingredients or fancy equipment. It’s perfect for busy mornings when you don’t have much time. You can have a delicious breakfast in just a few minutes.
Customization Options:
Feel free to customize this recipe to suit your preferences! Add different toppings and seasonings to make it your own. There are endless possibilities! This recipe is a blank canvas for your breakfast creativity.
Variations and Topping Ideas
Want to make your scrambled egg toast even more exciting? Here are some easy ways to change it up. Experiment with various toppings to discover your perfect match!
Savory Options:
Add a sprinkle of everything bagel seasoning for a salty, savory kick. Fresh herbs like chives or green onions also add a burst of flavor. Diced tomatoes bring a touch of freshness. Sliced avocado makes it extra creamy and healthy. Cooked bacon or sausage crumbles add a meaty, satisfying crunch. If you like it spicy, try a dash of hot sauce or sriracha. For a more sophisticated taste, add smoked salmon.
Sweet Options:
A drizzle of honey or maple syrup can turn this into a sweet treat. Fresh berries are a colorful and delicious addition. A dash of cinnamon enhances the flavor with its cozy warmth and aromatic spice.
Cheese Variations:
Experiment with different kinds of cream cheese. Chives and onion or garden vegetable cream cheese add extra flavor. You can also sprinkle shredded cheese on top of the eggs. Cheddar or mozzarella are great choices.
Tips for Success: Perfect Scrambled Egg Toast with Cream Cheese
Want to make the best-scrambled egg toast with cream cheese ever? Here are some easy tips to set you up for success. These tips will guarantee a delicious and satisfying breakfast every time.
Don’t Overcook the Eggs (Creamy Eggs are Key):
The secret to great scrambled eggs is to not overcook them. Slowly cook the eggs over low heat, stirring gently for a creamy texture. This will keep them soft and creamy. Overcooked eggs will be dry and rubbery. Creamy eggs are essential for perfect cream cheese egg toast
Use a Non-Stick Pan (Easy Cleanup):
A non-stick pan is your best friend for making scrambled eggs. It helps keep the eggs from sticking to the pan, making both cooking and cleanup effortless.
Toast the Bread Properly (Sturdy Base):
Make sure your toast is sturdy enough to hold the eggs and cream cheese. Toast it to your desired level of crispness. You don’t want soggy toast! The toast provides a perfect base for this cheesy egg toast.
Adjust Seasoning to Taste (Personalize Your Breakfast):
Add salt and pepper to taste. Don’t be afraid to experiment with other seasonings too! Find the perfect combination that you love. This is your chance to create the ultimate cream cheese scrambled eggs on toast.
Cream Cheese Temperature (Easy Spreading):
Let the cream cheese soften slightly before spreading it on the toast. This helps ensure an even and smooth spread. Soft cream cheese melts perfectly into the warm eggs.
Creamy Scrambled Egg Toast with Cream Cheese
Jasper wellspring
Elevate your breakfast with this quick and easy scrambled egg toast recipe featuring the creamy tang of cream cheese.
Toast the Bread: Toast the bread to your desired level of crispness. Set aside.
Prepare the Eggs: In a bowl, whisk together the eggs, milk or cream (if using), salt, and pepper until well combined.
Cook the Eggs: Melt the butter or heat the oil in a non-stick pan over medium-low heat.
Scramble: Pour the egg mixture into the pan. Cook, gently stirring and scraping, until the eggs are softly set and creamy. Avoid overcooking.
Assemble the Toast: Spread the softened cream cheese evenly on the toasted bread.
Top and Serve: Top the cream cheese-covered toast with the scrambled eggs. Add additional salt and pepper to taste, if desired. Serve immediately.
Notes
Creamy Eggs: For the creamiest scrambled eggs, cook them low and slow, stirring frequently.
Bread Choice: Sourdough, brioche, or whole wheat bread all work well.
Variations: Add toppings like chives, everything bagel seasoning, or hot sauce.
Cheese Options: Experiment with flavored cream cheeses like chive & onion or garlic & herb.
Your Questions Answered
Does cream cheese go with scrambled eggs?
Yes, cream cheese makes scrambled eggs extra creamy and delicious!
Is it OK to put cream cheese on toast?
Absolutely! Cream cheese on toast is a classic combo. It’s creamy and slightly tangy and pairs perfectly with sweet or savory toppings like jam, honey, smoked salmon, or even scrambled eggs. Delicious and versatile!
Scrambled egg and toast healthy?
Scrambled eggs and toast can be a healthy breakfast option, depending on how you prepare them: Why It’s Healthy: Eggs: Packed with high-quality protein, vitamins (B12, D), and minerals (selenium). Whole-Grain Toast: Provides fiber, complex carbs, and nutrients. Customizable: Add veggies (spinach, tomatoes) for extra nutrients. Tips to Keep It Healthier: Use minimal butter or oil for cooking. Opt for whole-grain or sourdough toast. Skip heavy cream in eggs; use a splash of milk or water instead. Add avocado or a sprinkle of seeds for healthy fats.
The healthiest way to eat scrambled eggs is by: Cook them with minimal butter or oil (use olive oil or a non-stick pan). Use egg whites or a mix of whole eggs and egg whites for lower cholesterol. Add vegetables like spinach, tomatoes, or bell peppers for extra nutrients. Avoid processed cheese and opt for a small amount of natural cheese. Cooking on low heat preserves nutrients and prevents burning.
Whether you stick to the basic recipe or get creative with toppings, Creamy Scrambled Egg Toast with Cream Cheese is a versatile breakfast that’s sure to satisfy.
Don’t miss out—follow us on social media for updates:
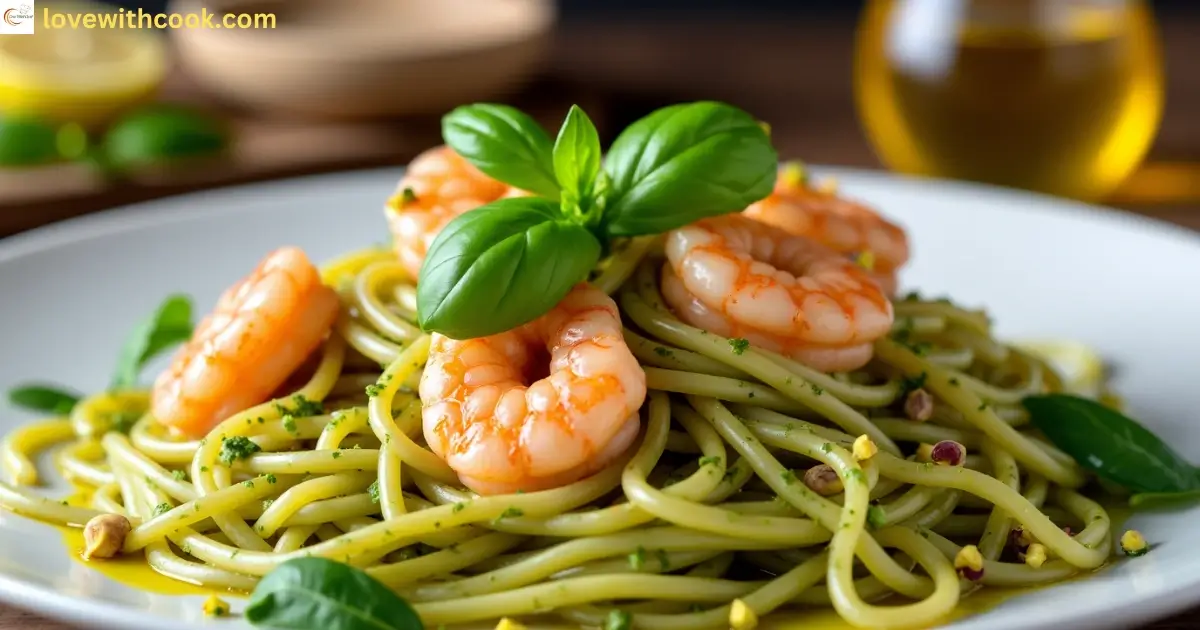
Embark on a culinary adventure with our enticing Pasta with Shrimp and Pistachio Pesto recipe—a unique twist that elevates traditional shrimp and pasta dishes. This recipe sits at the crossroads of innovation and comfort, blending the creamy textures found in popular shrimp recipes with pasta alongside the fresh zest of pico de gallo. Whether you’re drawn to the vibrant notes of a rasta pasta with shrimp recipe or are exploring new spins in creamy shrimp and pasta recipes with pico de gallo, this dish provides a harmonious balance of flavors that promises both visual appeal and savory satisfaction.
Quick Links
What You'll Find in This Guide
The Best Pasta with Shrimp and Pistachio Pesto recipe
The Best Pasta with Shrimp and Pistachio Pesto for Valentine’s
Best Pasta with Shrimp and Pistachio Pesto for Valentine’s, Italian-inspired shrimp past, Restaurant-style shrimp pesto pasta,valentine's day dinner recipes ideas easy
Prep Time15 minutesmins
Cook Time25 minutesmins
Total Time30 minutesmins
Course: Main Course
Cuisine: Italian
Keyword: Creamy pistachio pesto pasta, Easy shrimp pasta recipe, Gourmet shrimp and pesto dish, Healthy shrimp pasta recipe, Nutty pesto pasta with shrimp, Quick seafood pasta dinner
Servings: 2people
Calories: 650kcal
Author: Jasper wellspring
Ingredients
For the Pistachio Pesto:
1cupshelled pistachiosunsalted
2cupsfresh basil leaves
1/2cupgrated Parmesan cheese
2clovesgarlic
1/2cupextra-virgin olive oil
1tablespoonlemon juice
Salt and pepper to taste
For the Pasta and Shrimp:
12oz340g pasta (linguine, spaghetti, or your choice)
1lb450g large shrimp, peeled and deveined
2tablespoonsolive oil
3clovesgarlicminced
1/4teaspoonred pepper flakesoptional
Salt and pepper to taste
Lemon zestfor garnish
Fresh basil leavesfor garnish
Crushed pistachiosfor garnish
Get Recipe Ingredients
Instructions
Make the Pistachio Pesto:
In a food processor, combine pistachios, basil, Parmesan cheese, and garlic. Pulse until finely chopped.
With the processor running, slowly drizzle in the olive oil until the mixture is smooth and creamy.
Add lemon juice, salt, and pepper. Pulse to combine. Taste and adjust seasoning if needed. Set aside.
Cook the Pasta:
Bring a large pot of salted water to a boil. Cook the pasta according to package instructions until al dente. Reserve 1/2 cup of pasta water, then drain the pasta.
Cook the Shrimp:
Heat olive oil in a large skillet over medium heat. Add minced garlic and red pepper flakes (if using), and sauté for 1 minute until fragrant.
Add the shrimp to the skillet, season with salt and pepper, and cook for 2-3 minutes per side until pink and opaque. Remove from heat.
Combine Pasta, Shrimp, and Pesto:
In the same skillet (or a large mixing bowl), toss the cooked pasta with the pistachio pesto. Add reserved pasta water as needed to create a smooth sauce.
Gently fold in the cooked shrimp until everything is well coated.
Serve:
Divide the pasta among serving plates. Garnish with lemon zest, fresh basil leaves, and crushed pistachios.
Serve immediately and enjoy!
Video
Notes
Notes
For a nut-free version, substitute pistachios with sunflower seeds.
Store leftovers in an airtight container in the refrigerator for up to 2 days.
Nutrition of dish Pasta with Shrimp and Pistachio Pesto recipe (per serving)
Calories: 650
Carbohydrates: 50g
Protein: 35g
Fat: 35g
Saturated Fat: 6g
Cholesterol: 150mg
Sodium: 400mg
Fiber: 4g
Sugar: 2g
Freezing Instructions
This dish is best enjoyed fresh, but if you have leftovers or want to prepare it ahead of time, here’s how to freeze it:
Without Shrimp:
The pistachio pesto can be frozen separately for up to 3 months. Store it in an airtight container or freezer bag, leaving some room for expansion. Thaw in the refrigerator overnight before using.
As an Amazon Associate, I earn from qualifying purchases. This means that if you click on a link and make a purchase, I may receive a small commission at no extra cost to you. Thank you for your support!
With Shrimp:
Freezing cooked shrimp can affect its texture, making it slightly rubbery. If you still want to freeze the entire dish, store it in a freezer-safe container for up to 1 month. Reheat gently on the stovetop with a splash of water or broth to restore moisture.
As an Amazon Associate, I earn from qualifying purchases. This means that if you click on a link and make a purchase, I may receive a small commission at no extra cost to you. Thank you for your support!
Reheating Instructions: Pasta with Shrimp and Pistachio Pesto recipe
To enjoy your leftover pasta and shrimp dish while keeping its flavors and textures intact, follow these steps:
Stovetop Method (Recommended):
Place the pasta and shrimp in a large skillet or pan over medium heat.
Add a splash of water, broth, or olive oil to prevent drying out.
Stir gently until heated through, about 3-5 minutes. Avoid overcooking to keep the shrimp tender.
Microwave Method (Quick Option):
Transfer the pasta and shrimp to a microwave-safe dish.
Sprinkle a few drops of water or olive oil over the top to retain moisture.
Cover with a microwave-safe lid or a damp paper towel.
Heat on medium power in 30-second intervals, stirring in between, until warmed through (about 1-2 minutes total).
Oven Method (For Larger Portions):
Preheat the oven to 350°F (175°C).
Place the pasta and shrimp in an oven-safe dish. Add a splash of water or broth to keep it moist.
Cover with aluminum foil and bake for 10-15 minutes or until heated through.
Pro Tip: For the best results, reheat only the portion you plan to eat. Repeated reheating can affect the texture of the shrimp and pasta.
As an Amazon Associate, I earn from qualifying purchases. This means that if you click on a link and make a purchase, I may receive a small commission at no extra cost to you. Thank you for your support!
Serving Pasta with Shrimp and Pistachio PestoIdeas
Elevate your Pasta with Shrimp and Pistachio Pesto with these serving suggestions:
Garnish:
Top with extra crushed pistachios, fresh basil leaves, and a sprinkle of lemon zest for a pop of color and flavor.
Side Dishes:
Serve with a crisp green salad, garlic bread, or roasted vegetables like asparagus or cherry tomatoes.
Wine Pairing:
Pair with a chilled glass of Sauvignon Blanc or Pinot Grigio to complement the dish’s bright and nutty flavors.
Protein Swap:
Replace shrimp with grilled chicken, scallops, or even tofu for a vegetarian option.
Pasta Alternatives:
Use gluten-free pasta, zucchini noodles, or spaghetti squash for a lighter twist.
Frequently Asked Questions
What is the healthiest way to eat shrimp?
The healthiest way to eat shrimp is by grilling, steaming, or boiling them. These methods preserve their nutrients without adding extra fat or calories. Avoid frying or heavy sauces to keep it light and nutritious. Pairing shrimp with veggies or whole grains can also enhance the meal’s health benefits.
What can I eat with pasta to make it healthier?
To make pasta healthier, consider adding: Vegetables: Spinach, broccoli, zucchini, bell peppers, or tomatoes for extra fiber, vitamins, and minerals. Lean Protein: Grilled chicken, shrimp, or tofu for a protein boost. Healthy Fats: Olive oil or avocado for a dose of heart-healthy fats. Whole-Grain Pasta: Opt for whole wheat or legume-based pasta for more fiber. Herbs and Spices: Garlic, basil, oregano, and other herbs for flavor without extra calories.
What is the best sauce to eat with shrimp?
The best sauces to pair with shrimp are: Garlic Butter Sauce: A classic, rich, and flavorful option. Lemon Butter Sauce: Light and zesty, adding a fresh citrusy kick. Pesto: A vibrant and herbaceous option made from basil, garlic, olive oil, and pine nuts. Tomato-based Marinara: A tangy and savory sauce, especially with pasta. Cocktail Sauce: A tangy, slightly spicy option perfect for shrimp cocktails. Each of these sauces complements the shrimp’s natural flavor while enhancing the overall dish.
Do you add pesto before or after cooking pasta?
You should add pesto after cooking the pasta. Once the pasta is drained and still warm, toss it with the pesto to evenly coat the noodles. This ensures the pesto’s fresh flavor is preserved and sticks to the pasta without being heated too much.
What seafood goes well with pesto?
Seafood that pairs well with pesto includes: Shrimp: Its mild flavor complements pesto perfectly. Salmon: Rich, oily salmon contrasts nicely with the freshness of pesto. Scallops: Sweet and delicate, they pair well with the herbaceous notes of pesto. Lobster: The buttery texture of lobster goes wonderfully with pesto. Clams: The briny flavor of clams adds a nice balance to pesto’s richness. These seafood options work great with pesto on pasta or as standalone dishes.
As an Amazon Associate, I earn from qualifying purchases. This means that if you click on a link and make a purchase, I may receive a small commission at no extra cost to you. Thank you for your support!
In conclusion, the Pasta with Shrimp and Pistachio Pesto recipe stands out by bringing together a fusion of tastes—from the rich creaminess and delicate seafood notes to the bright, peppery hints of fresh pico de gallo. This dish reimagines the concept of shrimp recipes with pasta, offering a modern twist that evokes the spirited vibe of rasta pasta with shrimp while celebrating the nutty charm of pistachio pesto. The result is a multi-layered experience that is both inventive and comforting, ideal for a memorable meal that leaves a lasting impression.
So, why wait? Whip up this Pasta with Shrimp and Pistachio Pesto recipe and make this Valentine’s Day unforgettable. Happy cooking! 💖
Don’t miss out—follow us on social media for updates:
There’s nothing quite as comforting and indulgent as a perfectly cooked Garlic Butter Steak with Mashed Potatoes recipe. Whether planning a cozy date night or simply craving a hearty meal, this dish is a winner. Imagine tender, juicy steak bites smothered in a rich garlic butter sauce paired with creamy mashed potatoes, roasted vegetables, or a drizzle of savory gravy. It’s a meal that feels gourmet but is surprisingly easy to make—even for beginner cooks! Plus, with options to cook it on the stovetop or in the oven, this recipe is as versatile as it is delicious. Let’s dive into this mouthwatering combination that’s sure to become a favorite in your kitchen
What You'll Find in This Guide
Easy Garlic Butter Steak with Mashed Potatoes for Valentine’s
Jasper wellspring
Try this easy Garlic Butter Steak with Mashed Potatoes recipe for a perfect Valentine’s Day dinner. Juicy steak paired with creamy mashed potatoes for a romantic meal.
For a more romantic touch, serve with a side of roasted vegetables or a glass of red wine.
Adjust the steak cooking time based on your preferred level of doneness:
Medium-rare: 3-4 minutes per side
Medium: 5-6 minutes per side
Well-done: 7-8 minutes per side
Nutrition Information for Easy garlic Butter Steak with Mashed Potatoes recipe (per serving)
Calories: 750
Protein: 45g
Carbohydrates: 35g
Fat: 50g
Saturated Fat: 25g
Cholesterol: 180mg
Sodium: 400mg
Keyword Creamy Mashed Potatoes, Date Night Recipes, Garlic Butter Steak, Mashed Potatoes, Quick Steak Meal, Romantic Dinner Ideas, Valentine’s Day Dinner
Freezing Garlic Butter Steak with Mashed Potatoes:
For the Steak:
Allow the cooked steak to cool completely.
Slice the steak into bite-sized pieces (if not already in bites).
Place the steak in an airtight container or freezer-safe bag.
Pour any remaining garlic butter sauce over the steak to keep it moist.
Label with the date and freeze for up to 2-3 months.
For the Mashed Potatoes:
Let the mashed potatoes cool to room temperature.
Transfer them to a freezer-safe container or bag.
Flatten the mashed potatoes in the bag to remove excess air (this prevents freezer burn).
Label with the date and freeze for up to 1-2 months.
Reheating Instructions:
For the Steak:
Thaw the steak overnight in the refrigerator.
Reheat in a skillet over medium heat with a splash of olive oil or butter. Stir occasionally until heated through (about 5-7 minutes).
Alternatively, microwave in 30-second intervals until warm.
For the Mashed Potatoes:
Thaw the mashed potatoes in the refrigerator overnight.
Reheat on the stovetop in a saucepan over low heat, adding a splash of milk or cream to restore creaminess. Stir frequently.
Alternatively, microwave in 30-second intervals, stirring between each interval, until warm.
Serving Instructions:
For a Romantic Dinner: Plate the steak and mashed potatoes together, drizzle with extra garlic butter sauce, and garnish with fresh herbs like parsley or thyme. Serve with a side of roasted vegetables (e.g., asparagus or green beans) and a glass of red wine.
For a Comfort Food Meal: Add a side of gravy or a dollop of sour cream to the mashed potatoes. Pair with a simple salad or garlic bread for a hearty, satisfying meal.
For Meal Prep: Divide the steak and mashed potatoes into individual portions in meal prep containers. Add a side of steamed vegetables or a small salad for a complete, ready-to-go meal.
Frequently Asked Questions (FAQ)
Can you eat steak with mashed potatoes?
Yes! Steak and mashed potatoes are a perfect combo. The creamy potatoes complement the juicy, flavorful steak for a delicious and satisfying meal. 😊🍽️
Is garlic good for steak?
Yes! Garlic enhances the flavor of steak by adding a rich, savory depth. It pairs well with butter, herbs, and seasonings, making the steak more flavorful and aromatic. 😊🍽️
What tastes good on steak?
Many flavors pair well with steak! Some delicious options include: Garlic butter – adds a rich, savory flavor Salt & pepper – enhances natural taste Fresh herbs (rosemary, thyme) – add aroma Steak sauce – tangy and bold Mushroom sauce – creamy and earthy Chimichurri – fresh and zesty Blue cheese – rich and tangy
What gives steak the best flavor?
The best flavor in steak comes from: High-Quality Meat – well-marbled cuts like ribeye or filet mignon Proper Seasoning – simple salt and black pepper enhance the natural taste Garlic & Butter – adds rich, savory depth Fresh Herbs – rosemary and thyme infuse aromatic flavor High-Heat Searing – creates a flavorful crust Resting the Steak – keeps it juicy and tender These elements combine to make steak taste incredible! 😊🍽️
What meat goes best with mashed potatoes?
Mashed potatoes pair well with many types of meat, including: Steak – juicy and flavorful, perfect with creamy potatoes Roast Beef – tender and rich, great with gravy Chicken (Grilled or Roasted) – light and tasty with buttery potatoes Pork Chops – savory and delicious with a creamy side Meatloaf – classic comfort food combo Turkey – perfect for holiday meals with gravy Braised Short Ribs – tender and full of flavor These meats complement mashed potatoes for a hearty, satisfying meal! 😊🍽️
What sauce to eat mashed potatoes with?
Mashed potatoes taste amazing with these sauces: Brown Gravy – classic, rich, and savory Garlic Butter Sauce – creamy and flavorful Mushroom Sauce – earthy and delicious Cheese Sauce – smooth and cheesy Creamy Peppercorn Sauce – slightly spicy and bold Balsamic Glaze – tangy and slightly sweet Herb Cream Sauce – fresh and aromatic These sauces make mashed potatoes even more delicious! 😊🍽️
And there you have it—a show-stopping garlic butter steak bites with mashed potatoes recipe that’s perfect for any occasion, especially a romantic Valentine’s Day dinner. Whether you serve it with a side of vegetables, a drizzle of Worcestershire sauce, or a generous helping of gravy, this dish is guaranteed to impress. It’s easy to prepare, packed with flavor, and customizable to suit your taste. So, light some candles, pour a glass of wine, and enjoy this delicious meal with your loved one. After all, good food is the ultimate expression of love. Bon appétit!


![Soup Containers with Lids [48 Sets -32 oz.] Quart Plastic Deli Co...](https://m.media-amazon.com/images/I/51pUJidrMYL.jpg "Best Garlic Bread Stuffing Recipe for Thanksgiving 19")


