Raise your hand if you’ve ever stared into the fridge at 7 a.m., torn between “I should eat something nutritious” and “But I just want comfort food.” (Same.) This cottage cheese egg bake is the hug-in-a-dish solution. It’s fluffy, protein-packed, and sneaks in veggies so effortlessly, you’ll almost forget you’re being healthy. Plus, it reheats like a dream—hello, busy mornings!
Quick Links
What You'll Find in This Guide
Why This Recipe Works
Let’s talk cottage cheese. You’re missing out if you’ve only eaten it straight from the tub. When baked into eggs? Magic. It melts into this creamy, almost soufflé-like texture while bumping up the protein to keep you full for hours. And the best part? You can tweak it endlessly based on what’s lurking in your fridge.
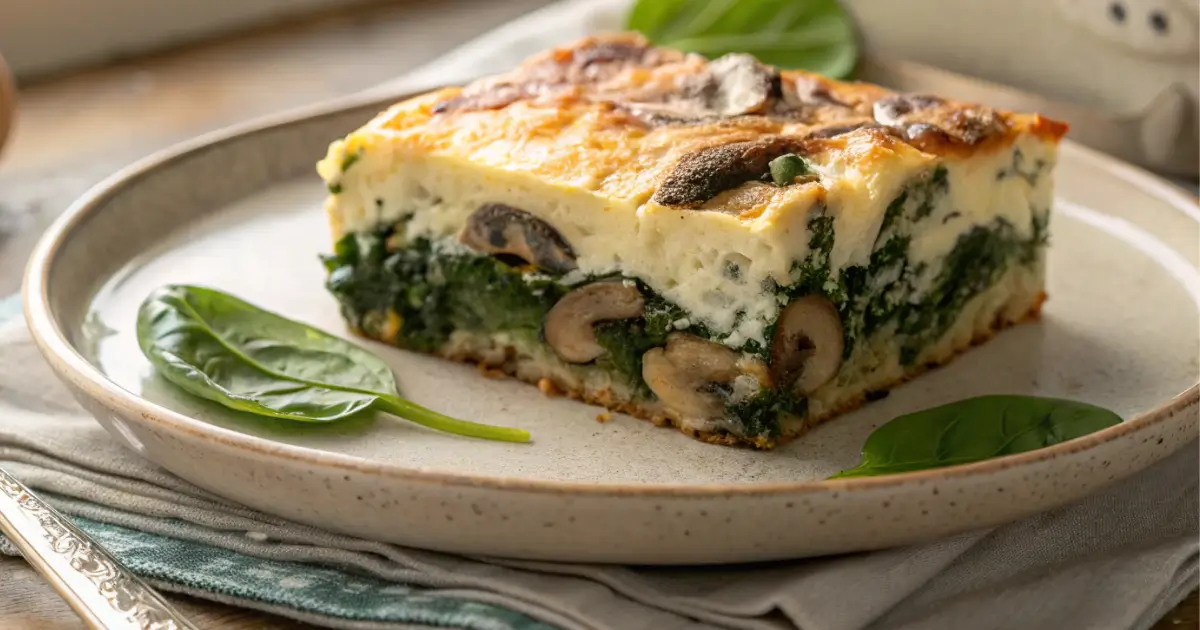
Ingredients of egg bake with cottage cheese and spinach
Grocery List (AKA Simple, Real Ingredients)
No obscure health-food-store finds here. Just:
Olive oil – For sautéing. Butter works too if you’re feeling indulgent.
Onion + mushrooms – The savory backbone. Creminis add earthiness, but whites work fine.
Spinach – Wilts down to nothing, so don’t skimp! Frozen works in a pinch (just thaw and squeeze dry).
Eggs + cottage cheese – The dynamic protein duo. Small-curd 4% milkfat gives the richest texture.
Seasonings – Garlic powder, onion powder, salt, and pepper. Basic but brilliant.
Feta – That salty tang that makes every bite interesting.
Step-by-Step (With Chef’s Notes)
Sauté the veggies: Cook onions and mushrooms with a pinch of salt until golden. Pro tip: Let them sit undisturbed for a minute to caramelize. Adds flavor depth!
Wilt the spinach: Off heat, stir in spinach until it collapses. No soggy greens here—just vibrant flecks throughout.
Layer it up: Veggies go in a greased 9×13 dish. No fancy arranging; rustic is charming.
Whisk the eggs: Beat eggs, cottage cheese, and seasonings until mostly smooth (a few curds are fine!). For silky texture? Blend it.
Bake to perfection: 350°F for ~30 minutes. It’s done when the center jiggles slightly—it’ll set as it cools. Let it rest 15 minutes (patience rewards you with clean slices).
Pro Tweaks & Troubleshooting
Texture issues? Overmixing = dense bake. Stir just until combined.
Make-ahead: Assemble the night before; bake in the AM. Or freeze portions for instant breakfasts.
Veggie swaps: Try roasted red peppers or zucchini. Just precook watery veggies to avoid sogginess.
Serving Ideas (Beyond Breakfast)
Brunch MVP: Top with avocado and hot sauce. Serve with roasted potatoes.
Light dinner: Pair with a crisp salad and crusty bread.
On-the-go: Cut into squares and wrap in parchment—protein-packed “muffin” alternative.
Leftover Love
Stores beautifully!
Fridge: Up to 5 days. Reheat with a damp paper towel to prevent drying.
Freezer: Wrap slices individually. Thaw overnight, then warm at 300°F to revive the texture.
Final Thought This isn’t just a recipe—it’s your new kitchen wingman. Flexible, forgiving, and forever delicious. (And if you sneak a slice cold from the fridge at midnight? We won’t judge.)
spinach cottage cheese egg bake
Fluffy spinach cottage cheese egg bake—protein-packed, easy to make, and perfect for meal prep! Ready in 40 mins
Preheat the oven to 350°F (175°C). Lightly grease a 9×13-inch baking dish.
Sauté onions and mushrooms in olive oil over medium heat for 6–8 minutes until softened and golden.
Add spinach and stir until wilted. Turn off heat.
Spread the veggie mixture evenly into the baking dish.
Whisk eggs, cottage cheese, garlic powder, onion powder, salt, and pepper in a large bowl until mostly smooth (small curds are fine).
Pour the egg mixture over the veggies. Top with crumbled feta. Use a fork to gently stir and distribute ingredients evenly.
Bake for 30 minutes or until the center is set but still slightly jiggly.
Rest for 15 minutes before slicing. Enjoy warm, at room temp, or cold!
Notes
Substitutions & Add-Ins
Veggies: Swap in bell peppers, broccoli, or zucchini (pre-cooked to remove excess moisture).
Protein: Add pre-cooked sausage, ham, or bacon for an extra boost.
Cheese: Sub with shredded mozzarella, cheddar, or dairy-free options.
Storage
Refrigerator: Store in an airtight container for up to 5 days.
Freezer: Freeze individual portions wrapped tightly for up to 3 months.
Reheating: Microwave with a damp paper towel or bake at 300°F until warmed through.
Serving Suggestions
Top with avocado and hot sauce
Pair with a salad for a light lunch
Slice and wrap for grab-and-go breakfasts
Recipe Notes
Want a smoother texture? Blend the eggs and cottage cheese.
Don’t overmix the eggs or the cake can turn dense.
This dish is perfect for make-ahead: assemble the night before, bake in the morning.
Frequently Asked
What does adding cottage cheese to eggs do?
Adding cottage cheese to eggs boosts protein, creates a creamy texture, and keeps the bake fluffy. It’s an easy way to add moisture and richness without heavy cream. Bonus Pro Tip: Blending the cottage cheese first makes it smoother, ideal for picky eaters who dislike curds
Is spinach and cottage cheese healthy?
Yes! Spinach and cottage cheese are a powerhouse combo packed with protein, calcium, iron, and vitamins (A, K, C). Low-calorie but filling, they support muscle health, bones, and immunity. A perfect healthy pair!
How to make baked cottage cheese eggs?
Whisk 6 eggs + 1 cup cottage cheese, pour over sautéed veggies (spinach, onions, mushrooms), top with feta, and bake at 350°F for 30 mins. High-protein, fluffy, and perfect for meal prep! For a full recipe: See my Cozy Spinach Cottage Cheese Egg Bake above!
Which is healthier, yogurt or cottage cheese?
Both are healthy, but cottage cheese wins for protein (28g per cup vs. yogurt’s ~10g), while yogurt has more probiotics for gut health. Choose cottage cheese for muscle repair, or yogurt for digestion or enjoy both
Don’t miss out—follow us on social media for updates:
Baked scrambled eggs are a blank canvas for your breakfast creativity! Add your favorite cheeses, vegetables, and meats to create a custom dish that everyone will love. This versatile recipe is perfect for brunch, meal prep, or a simple weekday breakfast.
Table of Contents
What You'll Find in This Guide
Why Choose Baked Scrambled Eggs for Breakfast?
There are several compelling reasons to ditch the skillet and embrace the oven for your scrambled eggs. Here’s why baking might just become your new favorite method:
Baking is ideal when you’re feeding a large group or prepping breakfast for the week. You can easily scale the recipe up or down to suit your needs, and the baked eggs are easy to cut into squares and serve. No more struggling to make individual batches of scrambled eggs! complete guide on how to prepare them, including tips, ingredient adjustments, and serving ideas.
Effortless Cooking:
Baking offers a truly hands-off approach. Unlike stovetop scrambling, you don’t need to stand and stir constantly. Simply whisk, pour, and bake! This frees you up to prepare other breakfast items or simply relax while your eggs cook themselves.
Unbeatable Texture:
The oven’s gentle heat creates a uniquely tender and fluffy texture that’s hard to achieve on the stovetop. The eggs bake evenly, resulting in a creamy, almost custard-like consistency that melts in your mouth. Say goodbye to dry, rubbery scrambled eggs!
Perfect for a Crowd:
Baking is ideal when you’re feeding a large group or prepping breakfast for the week. You can easily scale the recipe up or down to suit your needs, and the baked eggs are easy to cut into squares and serve. No more struggling to make individual batches of scrambled eggs!
Unleash Your Creativity: Flavorful Additions for Baked Scrambled Eggs
One of the best things about baked scrambled eggs for breakfast is their versatility. They’re a blank canvas for your culinary imagination! Here are a few suggestions to help you begin:
Add herbs and spices to taste.
Cheesy Goodness:
Cheddar, mozzarella, Gruyere, and feta are all fantastic choices. Experiment with different combinations to find your favorite cheesy flavor.
Add about 1/2 to 1 cup of shredded cheese per 6 eggs, adjusting to your preference.
Vegetable Medley:
Diced bell peppers, onions, spinach, mushrooms, and tomatoes add color, flavor, and nutrients.
Consider sautéing heartier vegetables like onions and mushrooms before adding them to the egg mixture.
Meaty Delights:
Cooked and crumbled bacon, sausage, ham, or chorizo add a savory and satisfying element.
Use about 1/2 to 1 cup of cooked meat per 6 eggs.
Herbs and Spices:
Fresh chives, parsley, dill, or oregano add a burst of freshness. Seasonings like paprika, garlic powder, or onion powder can boost flavor profiles.
To ensure your baked scrambled eggs turn out perfectly every time, keep these helpful tips in mind:
Avoid Overbaking:
The key to tender, creamy baked scrambled eggs is to avoid overbaking them. They should be firm around the edges but slightly jiggly in the center when taken out of the oven, as they will continue to cook while resting.
Grease Generously:
Thoroughly greasing your baking dish is crucial to prevent the eggs from sticking and ensure easy removal. Use butter or cooking spray, and make sure to coat the entire surface of the dish.
Adapt Baking Time:
Since oven temperatures may vary, keep an eye on your dish and adjust the baking time if necessary. Start checking the eggs a few minutes before the recommended time and continue baking until they reach your desired consistency.
Rest Before Serving:
Allow the baked scrambled eggs to rest for a few minutes before cutting and serving. This allows them to set further and makes them easier to slice.
Dairy-Free Options:
For a dairy-free version, substitute almond milk, soy milk, or coconut milk for the milk or cream in the recipe.
Elevating Your Oven Scrambled Eggs RecipeExperience: Serving Ideas
Baked scrambled eggs are delicious on their own, but here are some ways to make them even more enjoyable:
Classic Pairings:
Serve them alongside toasted bread, English muffins, or bagels for a complete breakfast.
Fruity Companions:
Fresh fruit, such as berries, melon, or sliced bananas, provides a refreshing contrast to the richness of the eggs.
Avocado Toast Upgrade:
Top slices of avocado toast with baked scrambled eggs for a satisfying and healthy meal.
Side Salad Addition:
A simple side salad adds a touch of lightness and freshness to the breakfast.
Brunch Buffet Star:
Baked scrambled eggs are a fantastic addition to any brunch buffet. They can be made ahead of time and kept warm until serving.
Meal Prep Magic:
These eggs are perfect for meal prepping. Store individual portions in the refrigerator and reheat them for a quick and easy breakfast throughout the week.
Reheating Instructions:
Reheat leftover baked scrambled eggs in the microwave or oven until warmed through.
Nutrition facts of scrambled eggs
Here’s a breakdown of the nutritional facts for scrambled eggs. Please remember that these values can vary based on the size of the egg and any added ingredients (like milk, butter, cheese, etc.). The following is based on one large egg scrambled without additional ingredients:
Approximate Nutritional Profile:
Calories: Around 91
Protein: About 6.3 grams
Fat: Approximately 6.76 grams
Saturated Fat: Roughly 2 grams
Cholesterol: Around 213 mg
Sodium: About 83 mg
Carbohydrates: Less than 1 gram
Key Vitamins and Minerals:
Eggs provide a rich variety of vitamins and minerals, such as:
Vitamin D: Crucial for maintaining strong bones and supporting the immune system.
Vitamin B12: This is Vital for proper nerve function and the formation of red blood cells.
Riboflavin (Vitamin B2): Helps convert food into energy.
Folate (Vitamin B9): Essential for healthy cell growth and development.
Selenium: A powerful antioxidant that helps protect the body from cell damage.
Choline: Important for brain health.
Important Points to Consider:
Cholesterol: Eggs are relatively high in cholesterol. However, current dietary guidelines suggest that for most people, dietary cholesterol has less impact on blood cholesterol levels than previously thought.
Added Ingredients: The nutritional content can change significantly when you add ingredients like milk, cheese, butter, or salt.
Preparation Method: The way you cook eggs can influence their nutritional value.. Cooking with oil or butter will increase the fat content.
If you have specific dietary concerns or health conditions, consulting with a healthcare professional or a registered dietitian for personalized advice is always a good idea.
Oven Baked Scrambled Eggs for Breakfas
Jasper wellspring
Enjoy perfectly cooked, fluffy scrambled eggs without the stovetop hassle! This baked recipe is easy, customizable, and great for crowds.
Grease Dish: Grease a 9×13 inch baking dish (or similar size) with butter or cooking spray.
Whisk Eggs: In a large bowl, whisk together the eggs, milk or cream, salt, and pepper until well combined.
Add Add-Ins (Optional): If desired, stir in your chosen add-ins (cheese, cooked meats, vegetables, herbs) into the egg mixture.
Pour into Dish: Pour the egg mixture into the prepared baking dish.
Bake: Bake for 20-25 minutes, or until the eggs are set but still slightly jiggly in the center.
Rest: Let the eggs rest for a few minutes before serving.
Serve: Cut into squares and serve immediately.
Notes
Add-In Ideas: Consider adding shredded cheddar cheese, cooked and crumbled bacon, diced bell peppers, chopped spinach, or a sprinkle of fresh herbs.
Baking Time: Baking time may vary depending on your oven. Check the eggs after 20 minutes and adjust accordingly.
Dairy-Free: Use almond milk or another dairy-free alternative for a dairy-free version.
Storage: Leftovers can be stored in the refrigerator for up to 3 days.
Frequently Asked Questions (FAQ)
Can you cook scrambled eggs in the oven?
Yes, you can cook scrambled eggs in the oven! Here’s a simple method: Preheat the oven to 350°F (175°C). Whisk the eggs with a bit of milk or cream, salt, and pepper. Pour the egg mixture into a greased baking dish. Bake for about 15-20 minutes, stirring halfway through to ensure even cooking. Once set, remove from the oven and serve.
scrambled egg and baked beans a healthy breakfast?
Yes, scrambled eggs and baked beans can be a healthy breakfast. Scrambled eggs provide protein and vitamins, while baked beans offer fiber and protein. To keep it healthy, opt for low-sugar beans and use less butter in the eggs.
How do you bake eggs instead of frying?
To bake eggs instead of frying: Preheat the oven to 350°F (175°C). Grease a baking dish or individual ramekins with butter or oil. Crack eggs into the dish, making sure they don’t overlap. Season with salt, pepper, and any other desired seasonings. Bake for about 10-15 minutes, or until the whites are set but the yolk remains runny. For firmer yolks, bake a bit longer. You can also add toppings like cheese, herbs, or vegetables before baking.
Do chefs add milk to scrambled eggs?
Yes, many chefs add milk (or cream) to scrambled eggs to make them creamier and softer. The milk helps create a smooth texture by preventing the eggs from becoming too dry or rubbery. However, some chefs prefer to skip the milk for a richer, more intense egg flavor, relying solely on butter or oil for moisture. It ultimately depends on personal preference and the desired consistency.
From simple additions to elaborate flavor combinations, Baked Scrambled Eggs for Breakfast are endlessly adaptable. So get creative, experiment with your favorite ingredients, and enjoy!
Don’t miss out—follow us on social media for updates:
Are you tired of the same old boring breakfast routine? Are your taste buds begging for something, anything, to break the monotony? The solution is simpler (and more delicious) than you think. Ditch the sugary cereals and bland toast and embrace the creamy revolution. Scrambled egg toast with cream cheese answers your breakfast prayers – a quick, easy, and utterly satisfying way to start your day.
Quick links
What You'll Find in This Guide
What makes scrambled egg toast with cream cheese Special?
This isn’t just another breakfast recipe. Scrambled egg toast with cream cheese is special for a few reasons. It’s all about the simple things that make a big difference.
The Magic of Cream Cheese:
Cream cheese makes this recipe amazing. It adds a creamy and tangy flavor to the eggs. The cream cheese melts into the warm eggs, making them extra rich. It’s a simple addition that takes scrambled eggs to the next level.
Simplicity and Speed:
This recipe is quick and easy to make. You don’t need a lot of ingredients or fancy equipment. It’s perfect for busy mornings when you don’t have much time. You can have a delicious breakfast in just a few minutes.
Customization Options:
Feel free to customize this recipe to suit your preferences! Add different toppings and seasonings to make it your own. There are endless possibilities! This recipe is a blank canvas for your breakfast creativity.
Variations and Topping Ideas
Want to make your scrambled egg toast even more exciting? Here are some easy ways to change it up. Experiment with various toppings to discover your perfect match!
Savory Options:
Add a sprinkle of everything bagel seasoning for a salty, savory kick. Fresh herbs like chives or green onions also add a burst of flavor. Diced tomatoes bring a touch of freshness. Sliced avocado makes it extra creamy and healthy. Cooked bacon or sausage crumbles add a meaty, satisfying crunch. If you like it spicy, try a dash of hot sauce or sriracha. For a more sophisticated taste, add smoked salmon.
Sweet Options:
A drizzle of honey or maple syrup can turn this into a sweet treat. Fresh berries are a colorful and delicious addition. A dash of cinnamon enhances the flavor with its cozy warmth and aromatic spice.
Cheese Variations:
Experiment with different kinds of cream cheese. Chives and onion or garden vegetable cream cheese add extra flavor. You can also sprinkle shredded cheese on top of the eggs. Cheddar or mozzarella are great choices.
Tips for Success: Perfect Scrambled Egg Toast with Cream Cheese
Want to make the best-scrambled egg toast with cream cheese ever? Here are some easy tips to set you up for success. These tips will guarantee a delicious and satisfying breakfast every time.
Don’t Overcook the Eggs (Creamy Eggs are Key):
The secret to great scrambled eggs is to not overcook them. Slowly cook the eggs over low heat, stirring gently for a creamy texture. This will keep them soft and creamy. Overcooked eggs will be dry and rubbery. Creamy eggs are essential for perfect cream cheese egg toast
Use a Non-Stick Pan (Easy Cleanup):
A non-stick pan is your best friend for making scrambled eggs. It helps keep the eggs from sticking to the pan, making both cooking and cleanup effortless.
Toast the Bread Properly (Sturdy Base):
Make sure your toast is sturdy enough to hold the eggs and cream cheese. Toast it to your desired level of crispness. You don’t want soggy toast! The toast provides a perfect base for this cheesy egg toast.
Adjust Seasoning to Taste (Personalize Your Breakfast):
Add salt and pepper to taste. Don’t be afraid to experiment with other seasonings too! Find the perfect combination that you love. This is your chance to create the ultimate cream cheese scrambled eggs on toast.
Cream Cheese Temperature (Easy Spreading):
Let the cream cheese soften slightly before spreading it on the toast. This helps ensure an even and smooth spread. Soft cream cheese melts perfectly into the warm eggs.
Creamy Scrambled Egg Toast with Cream Cheese
Jasper wellspring
Elevate your breakfast with this quick and easy scrambled egg toast recipe featuring the creamy tang of cream cheese.
Toast the Bread: Toast the bread to your desired level of crispness. Set aside.
Prepare the Eggs: In a bowl, whisk together the eggs, milk or cream (if using), salt, and pepper until well combined.
Cook the Eggs: Melt the butter or heat the oil in a non-stick pan over medium-low heat.
Scramble: Pour the egg mixture into the pan. Cook, gently stirring and scraping, until the eggs are softly set and creamy. Avoid overcooking.
Assemble the Toast: Spread the softened cream cheese evenly on the toasted bread.
Top and Serve: Top the cream cheese-covered toast with the scrambled eggs. Add additional salt and pepper to taste, if desired. Serve immediately.
Notes
Creamy Eggs: For the creamiest scrambled eggs, cook them low and slow, stirring frequently.
Bread Choice: Sourdough, brioche, or whole wheat bread all work well.
Variations: Add toppings like chives, everything bagel seasoning, or hot sauce.
Cheese Options: Experiment with flavored cream cheeses like chive & onion or garlic & herb.
Your Questions Answered
Does cream cheese go with scrambled eggs?
Yes, cream cheese makes scrambled eggs extra creamy and delicious!
Is it OK to put cream cheese on toast?
Absolutely! Cream cheese on toast is a classic combo. It’s creamy and slightly tangy and pairs perfectly with sweet or savory toppings like jam, honey, smoked salmon, or even scrambled eggs. Delicious and versatile!
Scrambled egg and toast healthy?
Scrambled eggs and toast can be a healthy breakfast option, depending on how you prepare them: Why It’s Healthy: Eggs: Packed with high-quality protein, vitamins (B12, D), and minerals (selenium). Whole-Grain Toast: Provides fiber, complex carbs, and nutrients. Customizable: Add veggies (spinach, tomatoes) for extra nutrients. Tips to Keep It Healthier: Use minimal butter or oil for cooking. Opt for whole-grain or sourdough toast. Skip heavy cream in eggs; use a splash of milk or water instead. Add avocado or a sprinkle of seeds for healthy fats.
The healthiest way to eat scrambled eggs is by: Cook them with minimal butter or oil (use olive oil or a non-stick pan). Use egg whites or a mix of whole eggs and egg whites for lower cholesterol. Add vegetables like spinach, tomatoes, or bell peppers for extra nutrients. Avoid processed cheese and opt for a small amount of natural cheese. Cooking on low heat preserves nutrients and prevents burning.
Whether you stick to the basic recipe or get creative with toppings, Creamy Scrambled Egg Toast with Cream Cheese is a versatile breakfast that’s sure to satisfy.
Don’t miss out—follow us on social media for updates:
Start your day with the perfect blend of flavor and nutrition with our Almond-Buckwheat Granola recipe. This delightful almond and buckwheat breakfast granola combines the crunch of almonds with the wholesome goodness of buckwheat, making it a versatile choice for any meal. Whether you’re looking for the best Almond-Buckwheat Granola or a quick and healthy snack, this recipe is sure to satisfy you.
Not only is this almond-buckwheat granola for breakfast packed with nutrients, but it’s also ideal for those seeking a gluten-free almond-buckwheat granola option. With simple ingredients and easy steps, this Homemade Almond-Buckwheat Granola recipe will quickly become a staple in your kitchen. Ready to enjoy a breakfast that’s as delicious as it is nutritious? Let’s dive into the details!
Quick Links
What You'll Find in This Guide
Why Choose Almond-Buckwheat Granola?
When it comes to healthy breakfasts, almond buckwheat granola stands out as a powerhouse of nutrition and flavor. From the crunch of almonds to the unique benefits of buckwheat, this granola isn’t just a meal—it’s an experience that keeps you full, energized, and ready to tackle the day.
Nutritional Benefits of Almonds
Almonds are more than just a crunchy addition to your almond-buckwheat granola—they’re a nutritional goldmine. Packed with healthy fats, plant-based protein, and a generous dose of vitamin E, almonds are known to support heart health and skin vitality. Their natural crunch adds texture, making every bite satisfying.
Including almonds in your granola also delivers magnesium, a key mineral for energy production and muscle health. Whether you’re a gym enthusiast or simply looking to stay active, the nutrients in almonds can help you power through your day. Plus, they pair perfectly with the heartiness of buckwheat for a balanced, nutritious breakfast.
Gluten-free almond-buckwheat granola
Buckwheat might not be as common as oats, but it’s a rising star in the world of healthy eating. As a naturally gluten-free seed, buckwheat is a fantastic option for those with dietary restrictions or anyone seeking a nutrient-dense alternative.
This superfood is rich in fiber, which promotes digestive health, and it also contains high-quality plant-based protein. Buckwheat’s unique, nutty flavor brings depth to almond-buckwheat granola, creating a wholesome base that’s both filling and satisfying. Whether you’re gluten-intolerant or simply looking for variety, buckwheat is a stellar addition to your breakfast bowl.
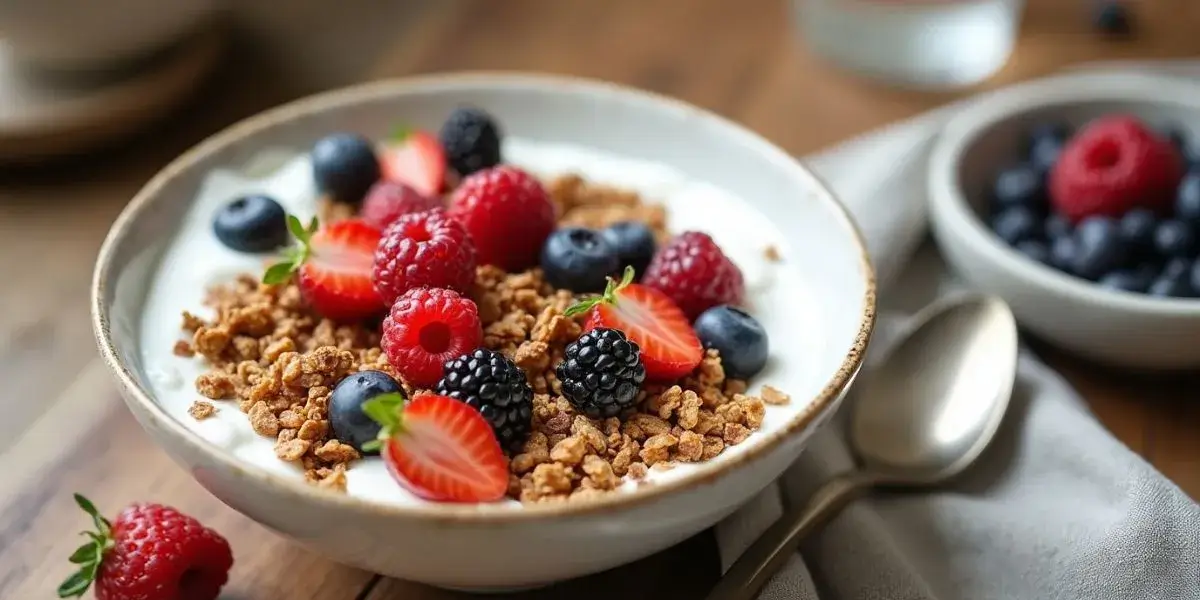
The Power of Yogurt and Berries in Your Granola
Adding yogurt and berries to almond-buckwheat granola takes this breakfast to a whole new level. Yogurt, rich in probiotics and protein, supports gut health while adding a creamy texture that balances the crunch of the granola. Opt for Greek yogurt if you’re aiming for extra protein, or try dairy-free alternatives for a plant-based option.
Berries, on the other hand, bring a burst of natural sweetness and a hefty dose of antioxidants. Whether you’re tossing in blueberries, raspberries, or strawberries, these colorful fruits pack vitamins and fiber that support your overall well-being. Together, yogurt and berries enhance the nutritional profile of almond-buckwheat granola, making it a complete and delicious meal.
Choosing almond-buckwheat granola isn’t just about breakfast—it’s about choosing health, flavor, and versatility. From the benefits of almonds to the gluten-free goodness of buckwheat and the powerhouse pairing of yogurt and berries, this granola delivers everything you need to start your day right.
How to Make Almond-Buckwheat Granola Recipe (Step-by-Step Recipe)
Making an almond-buckwheat granola recipe at home is easier than you think! With a handful of simple ingredients and a little prep, you can whip up a batch of this nutritious, crunchy treat to enjoy all week. Follow this step-by-step guide to create a granola that’s as flavorful as it is wholesome.
Ingredients
To make your almond-buckwheat granola, gather these essential ingredients:
1 cup raw almonds, roughly chopped
1 cup raw buckwheat groats
2 cups rolled oats
1/3 cup maple syrup (or honey for a sweeter touch)
1/4 cup coconut oil, melted
1 tsp vanilla extract
1 tsp ground cinnamon
1/4 tsp sea salt
Optional add-ins: shredded coconut, chia seeds, or dried fruit
These ingredients combine to create the perfect balance of crunch and flavor, making your almond-buckwheat granola irresistible. Feel free to adjust the quantities or swap ingredients to suit your taste.
Ingredient
Amount
Buckwheat
1 cup
Almonds (chopped or whole)
1 cup
Oats (rolled)
1 cup
Ground cinnamon
1 teaspoon
Sea salt
1/4 teaspoon
Coconut oil (melted)
1/4 cup
Maple syrup
1/4 cup
Vanilla extract
1 teaspoon
Instructions
1. Prepare the Dry Ingredients
In a large mixing bowl, mix the buckwheat, almonds, oats, cinnamon, and sea salt. Stir thoroughly to make sure the spices are well incorporated throughout. This dry mixture forms the base of your almond-buckwheat granola and gives it its signature crunch.
2. Add the Wet Ingredients
In a small bowl, whisk together the melted coconut oil, maple syrup, and vanilla extract until well combined. Pour this liquid mixture over the dry ingredients and stir thoroughly. Make sure every piece of buckwheat and almond is coated with the sweet, fragrant mixture—it’s the secret to perfectly golden granola.
3. Bake the Granola
Preheat your oven to 325°F (165°C) and line a baking sheet with parchment paper for easy cleanup. Spread the granola mixture evenly across the sheet in a single layer. Bake for 20 minutes, then stir gently to promote even browning. Bake for an additional 10-15 minutes, or until the granola turns golden and emits a fragrant aroma. Be sure to monitor it closely to avoid burning.
4. Cool and Store
Once baked, let your almond-buckwheat granola cool completely on the baking sheet. This allows it to crisp up further. Once cool, transfer the granola to an airtight container for storage. It will stay fresh for up to two weeks—perfect for quick breakfasts or snacks.
Pro Tip for Perfection
For clusters of almond-buckwheat granola, press the mixture firmly onto the baking sheet before baking and avoid stirring too much during the cooking process. This trick helps the granola stick together in delicious clumps!
Making almond-buckwheat granola at home not only ensures you know exactly what’s going into your food but also allows you to customize flavors and add-ins to your liking. It’s easy, fun, and worth the effort. Once you’ve tried this recipe, you’ll never go back to store-bought granola!
Serving Ideas: Yogurt and Berries Pairing
Once you’ve made your almond-buckwheat granola recipe, it’s time to take it to the next level with creamy yogurt and fresh, juicy berries. This trio isn’t just visually stunning; it’s a nutrient-packed powerhouse that turns a simple breakfast or snack into a gourmet experience. Here’s how to make the most of this winning combination.
Perfecting the Layering Technique
Creating a beautiful granola bowl or parfait starts with the art of layering. Begin with a base of your favorite yogurt—Greek yogurt for a protein boost, or coconut yogurt for a dairy-free option. Add a generous sprinkle of almond-buckwheat granola on top, followed by a handful of fresh berries. Repeat the layers until your bowl or glass is brimming with goodness.
The layering isn’t just about aesthetics—it’s about balance. Each spoonful will give you the perfect bite of creamy yogurt, crunchy almond-buckwheat granola, and the sweet, tart burst of berries. Whether you’re serving it in a clear parfait glass or your favorite breakfast bowl, this technique ensures every bite is as delicious as the last.
Customization Tips
One of the best things about almond buckwheat granola is how customizable it is. Mix and match your ingredients to create endless variations:
Yogurt Options: Try Greek yogurt for a thick and tangy base, plain yogurt for a classic touch, or plant-based alternatives like almond or cashew yogurt for a vegan-friendly treat.
Berry Choices: Blueberries, raspberries, strawberries, or blackberries all work beautifully. For extra sweetness, toss in some sliced bananas or mango chunks.
Additional Toppings: Sprinkle on extras like chia seeds, shredded coconut, or a drizzle of honey for added flavor and texture. Craving a little indulgence? Add a few dark chocolate shavings to your bowl.
Experiment with these combinations to make your almond-buckwheat granola and yogurt pairing uniquely yours.
Elevate Your Serving Style
For a grab-and-go option, layer your almond-buckwheat granola and yogurt in a mason jar with berries in between. This portable parfait is perfect for busy mornings or a quick snack at work. Hosting brunch? Serve granola parfaits in individual glasses for a stunning and healthy addition to your spread.
Healthy Buckwheat Granola recipe
When it comes to healthy eating, the almond-buckwheat granola recipe checks all the boxes. It’s a deliciously crunchy and nutrient-dense option that keeps you energized throughout the day. Let’s explore what makes almond-buckwheat granola a standout choice for your breakfast or snack routine.
Low Sugar, High Protein
One of the biggest advantages of almond-buckwheat granola is its low sugar content. Unlike many store-bought options loaded with refined sugars, this homemade granola is sweetened naturally with ingredients like maple syrup or honey. This not only satisfies your sweet tooth but also helps you avoid blood sugar spikes.
On top of that, the almond-buckwheat granola recipe is packed with protein, thanks to the combination of almonds, buckwheat, and yogurt (if you add it as a pairing). Protein is essential for keeping you full, maintaining muscle mass, and fueling your body for daily activities. This makes almond-buckwheat granola an ideal choice for anyone aiming to eat healthier without sacrificing flavor.
Full of Essential Nutrients
Almond-buckwheat granola recipe isn’t just tasty—it’s a nutritional powerhouse. Here’s a quick rundown of what you’re getting in every bowl:
Fiber: Both buckwheat and almonds are excellent sources of dietary fiber, which supports digestive health and helps regulate appetite.
Healthy Fats: Almonds provide heart-healthy monounsaturated fats, which can improve cholesterol levels and support brain health.
Antioxidants: Ingredients like almonds and berries (when paired with the granola) are loaded with antioxidants that combat oxidative stress and promote overall well-being.
Vitamins and Minerals: From vitamin E in almonds to magnesium in buckwheat, every ingredient contributes something beneficial to your diet.
This balance of macronutrients and micronutrients is what makes the almond-buckwheat granola recipe such a healthy and satisfying option.
A Healthier Alternative to Store-Bought Granola
Store-bought granolas often come with hidden downsides: added sugars, artificial preservatives, and unhealthy fats. Making almond-buckwheat granola at home puts you in control of the ingredients, ensuring your granola is as wholesome as possible. You can customize it to meet your dietary needs—whether you’re looking for gluten-free, vegan, or low-sugar options.
Incorporating Almond and buckwheat breakfast granola into your morning routine is a delicious and nutritious way to fuel your day. This Almond-Buckwheat Granola recipe offers a perfect balance of flavors and ensures a healthy and satisfying start. Whether you’re seeking the best Almond-Buckwheat Granola or an option that aligns with dietary needs like a gluten-free almond-buckwheat granola, this recipe is designed to meet your expectations.
Preparing this Homemade Almond-Buckwheat Granola allows you to control the ingredients, avoiding unnecessary additives while creating a truly wholesome dish. Pair it with yogurt, fresh berries, or your favorite plant-based milk for a balanced and energizing breakfast.
Ready to transform your mornings? Try this Almond-Buckwheat Granola recipe today and experience the difference homemade goodness can make. For more inspiration, visit our Healthy Breakfast Recipes page. Additionally, explorethe benefits of almonds in this insightful way to learn more about the nutritional value of the ingredients.
Start your day with the perfect blend of flavor and nutrition—one bowl of almond buckwheat granola at a time!
Frequently Asked Questions
What are the benefits of buckwheat granola?
Buckwheat granola offers numerous health benefits, including: Rich in Fiber: Helps with digestion and supports heart health. Gluten-Free: A great option for those with gluten sensitivities. Packed with Protein: Provides a good amount of plant-based protein, making it a filling option. High in Antioxidants: Buckwheat is rich in antioxidants, promoting overall health and reducing inflammation. Supports Blood Sugar Control: Buckwheat has a low glycemic index, helping to stabilize blood sugar levels. This makes buckwheat granola a nutritious choice for breakfast or snacking!
What does buckwheat do for your body?
Buckwheat offers several health benefits, including: Supports Heart Health: Its high fiber content helps lower cholesterol levels. Improves Digestion: Buckwheat is rich in soluble fiber, which aids in digestive health. Stabilizes Blood Sugar: Buckwheat’s low glycemic index helps control blood sugar levels. Boosts Antioxidant Intake: Rich in antioxidants, buckwheat helps fight inflammation and oxidative stress. Supports Weight Management: Buckwheat is filling and nutrient-dense, making it an excellent choice for weight control. Adding buckwheat to your diet can contribute to overall well-being!
Is buckwheat healthier than oats?
Both buckwheat and oats are highly nutritious, but each offers unique benefits: Buckwheat is higher in protein and antioxidants, and it’s gluten-free, making it an excellent choice for those with gluten sensitivities. Oats are rich in soluble fiber, particularly beta-glucan, which is great for heart health and cholesterol management. In terms of overall nutrition, buckwheat offers more antioxidant power and protein, while oats are better for heart health due to their fiber content. The best choice depends on your dietary needs!
Is buckwheat healthy for weight loss?
Yes, buckwheat can be a great addition to a weight-loss diet. It is low in calories, and high in fiber, and protein, which helps keep you full longer and reduce overall calorie intake. Additionally, its low glycemic index helps regulate blood sugar levels, preventing spikes and crashes that can lead to overeating. Its nutrient-dense nature makes it a satisfying and healthy choice for weight management.
Is buckwheat gluten-free good for you?
Yes, buckwheat is naturally gluten-free and is an excellent choice for those with gluten sensitivities or celiac disease. It is packed with essential nutrients, including protein, fiber, and antioxidants, which contribute to overall health. Buckwheat supports heart health, aids digestion, and helps regulate blood sugar levels, making it a nutritious addition to a balanced diet.
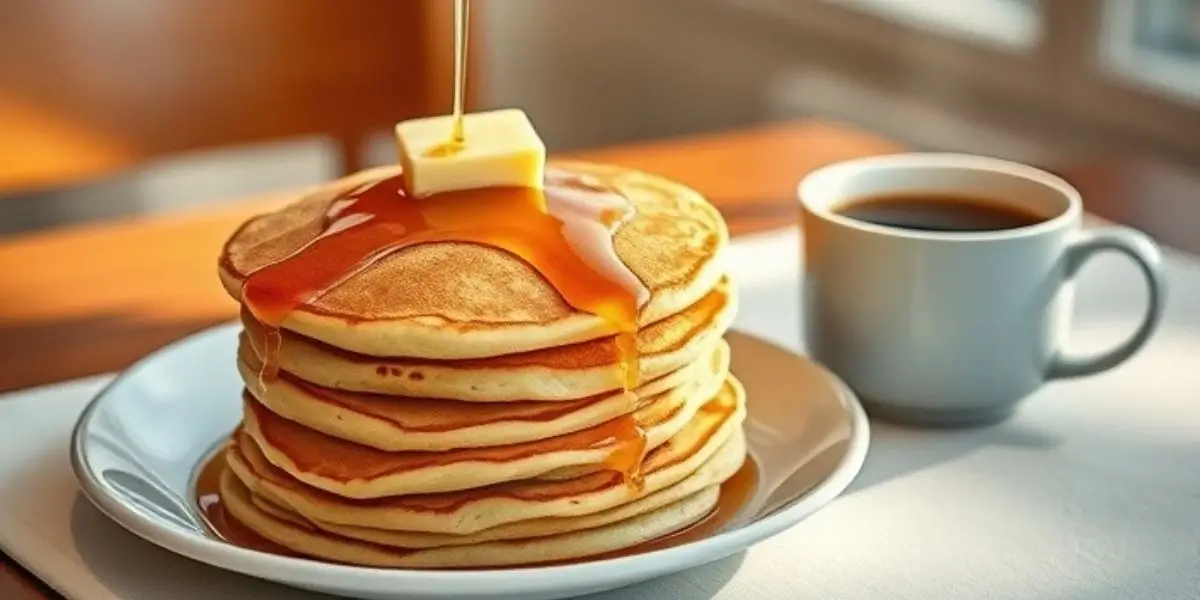
The Best Fluffy Pancakes for Breakfast are more than just a meal—they’re a delightful way to start your day with comfort and joy. Whether you’re enjoying a lazy Sunday morning or hosting a brunch, there’s no better choice than the Best Fluffy Pancakes for Breakfast to create warm, happy memories. Light, airy, and melt-in-your-mouth delicious, these pancakes are a must-try for any breakfast lover.
This recipe is your go-to guide for making the Best Fluffy Pancakes for Breakfast with ease. Using simple pantry staples, you’ll whip up soft, pillowy pancakes that pair perfectly with syrup, fresh berries, or powdered sugar. Ready to elevate your mornings? Let’s get started!
Quick Links
What You'll Find in This Guide
Why Fluffy Pancakes Are the Best Choice for Breakfast
When it comes to breakfast, there’s just something magical about a stack of fluffy pancakes. From their light texture to their comforting warmth, fluffy pancakes create the perfect start to any morning. But what makes them so special? Let’s break down why fluffy pancakes are truly the best choice for your breakfast.
The Appeal of Fluffiness
The true charm of fluffy pancakes lies in their texture. Unlike dense or flat pancakes, fluffy ones are light and airy, almost like little pillows of joy. When you take a bite, they melt in your mouth, leaving behind the perfect balance of soft, buttery flavor. The fluffiness also makes them more satisfying without feeling too heavy, making them the ideal breakfast dish to enjoy without that post-meal sluggishness. When you master the art of making fluffy pancakes, you’re guaranteed a breakfast that both fills you up and leaves you feeling energized.
Fluffy Pancakes Elevate Any Breakfast Table
Whether you’re serving them for a holiday breakfast, a casual weekend treat, or even a weeknight dinner, fluffy pancakes instantly elevate the meal. Their light texture and golden-brown color make them visually appealing, while their delicious taste will keep everyone coming back for more. Unlike pancakes that are heavy and dense, fluffy pancakes create a more indulgent yet guilt-free experience. Imagine the stack on your breakfast plate, topped with syrup and fresh fruit—it’s the perfect comfort food, ideal for any occasion.
Why Fluffy Pancakes Are Versatile
Another reason why fluffy pancakes are the best choice for breakfast is their versatility. They can be enjoyed with a wide range of toppings, from classic maple syrup and butter to fresh berries, whipped cream, or even chocolate chips. Want to get creative? Add some cinnamon, vanilla extract, or a handful of nuts for extra flavor. The sky’s the limit! This flexibility makes fluffy pancakes a favorite for anyone, whether you prefer a simple or more decadent breakfast.
In the next sections, we’ll dive into the key ingredients that make these pancakes so light and airy, and teach you the techniques to get them just right. Trust us, once you learn the secret to fluffy pancakes, there will be no turning back!
Key Ingredients for Best Fluffy Pancakes
Making Best Fluffy Pancakes for Breakfast at home is all about using the right ingredients. While it may seem like a simple dish, the combination of the right pantry staples can make a huge difference in texture and flavor. Let’s explore the key ingredients that will help you create the fluffiest pancakes every time.
Essential Ingredients
Flour: Flour is the foundation of any good pancake batter, and for fluffy pancakes, all-purpose flour is your best bet. It strikes the perfect balance between structure and softness, allowing your pancakes to rise without being too heavy. Using the right flour ensures a tender crumb that’s essential for achieving that melt-in-your-mouth texture.
Baking Powder: Here’s the secret ingredient that makes fluffy pancakes rise and become light and airy. Baking powder is a leavening agent that causes the batter to expand when cooked, giving your pancakes that signature fluffiness. Be sure to use fresh baking powder, as old or expired powder can lead to flat pancakes.
Milk: Milk contributes moisture to the pancake batter and helps achieve the perfect consistency. It also enhances the flavor, adding richness without making the pancakes too heavy. Whole milk is preferred for its creaminess, but you can use any type of milk based on your preference.
Eggs: Eggs are crucial for holding the ingredients together and providing the necessary structure to your pancakes, ensuring they stay fluffy and firm. They help the pancakes rise while also contributing to the overall fluffiness. Be sure to whisk the eggs thoroughly into the batter for even distribution.
Butter: A touch of melted butter in the batter adds flavor and moisture, making your pancakes soft and tender. It also contributes to the golden-brown color and a slightly crispy edge. You can use unsalted butter for more control over the seasoning, or swap in vegetable oil for a lighter option.
Sugar & Salt: Sugar brings a hint of sweetness to your fluffy pancakes, while salt balances the flavors, making sure they’re not overly sweet. A pinch of salt is all you need to enhance the overall taste and bring out the best in your pancakes.
Optional Ingredients for Extra Flavor
To take your fluffy pancakes to the next level, consider adding a few optional ingredients that bring in extra flavor and depth.
Vanilla Extract: A teaspoon of vanilla extract can elevate your pancake batter with a subtle, sweet aroma that makes each bite feel like a special treat. It’s a simple addition that adds a lot of character.
Cinnamon: If you love a touch of spice, adding cinnamon to the batter can give your pancakes a warm, cozy flavor. It complements maple syrup or fresh fruit toppings perfectly, enhancing the flavor and making your pancakes even more tempting.
These ingredients combine to create the perfect fluffy pancakes, but don’t be afraid to experiment! In the next section, we’ll go over the exact steps to make this recipe come to life in your kitchen. Whether you stick with the basics or customize your pancakes with extra flavor, the result will be delicious and perfectly fluffy.
Step-by-Step Instructions for Making Best Fluffy Pancakes
Now that you know the key ingredients for making fluffy pancakes, it’s time to get cooking! Follow these simple steps to create light, airy, and delicious pancakes that will impress your family and friends. The process is straightforward, and with a little practice, you’ll be flipping pancakes like a pro!
Preparing the Pancake Batter
Begin by collecting all your ingredients and carefully measuring them. This ensures that everything is ready to go, making the process smooth and efficient.
Mix the Dry Ingredients: In a large bowl, combine your all-purpose flour, baking powder, sugar, and a pinch of salt. Stir them together to ensure the dry ingredients are well-distributed. This step helps the baking powder activate evenly, which is key for fluffy pancakes.
Add the Wet Ingredients: In a separate bowl, whisk together the eggs, milk, and melted butter (or oil). Make sure the butter has cooled slightly before adding it to the wet mixture, as too much heat can affect the texture. Add the wet ingredients to the dry ingredients and stir lightly until just mixed.
Do Not Overmix: This is the crucial step for achieving fluffy pancakes. You want the batter to be mixed enough that it’s slightly lumpy, but not so much that it becomes smooth. Overmixing activates the gluten in the flour, resulting in denser, tougher pancakes. So, fold the wet and dry ingredients gently—this will ensure your pancakes stay light and airy.
Cooking the Pancakes
With your batter prepared, it’s time to start cooking. Follow these tips to make sure your pancakes come out perfectly fluffy.
Heat the Pan: Preheat a nonstick griddle or large skillet over medium heat. You can test the temperature by sprinkling a few drops of water onto the pan—if the water sizzles and evaporates quickly, your pan is ready. Lightly grease the pan with a little butter or oil to prevent the pancakes from sticking.
Pour the Batter: Using a ladle or measuring cup, pour about 1/4 cup of batter for each pancake onto the heated pan. Be sure to leave some space between each pancake to allow for expansion as they cook.
Wait for the Bubbles: As the pancakes cook, small bubbles will begin to form on the surface. This is your cue to flip! Once you see bubbles around the edges and the top starts to set, it’s time to turn them over. This usually takes about 2 to 3 minutes per side, depending on your heat level.
Perfect Pancake Flip: Using a spatula, carefully flip each pancake and cook for another 1-2 minutes until the other side is golden brown. You’ll know your pancakes are done when they’re puffed up and light, with a slight crispiness on the edges.
The Fluffy Pancake Finish
Once your pancakes are cooked, stack them up on a plate and serve immediately. You’ll notice how light and fluffy each bite is, with a golden brown exterior that’s perfectly crispy. Whether you opt for a pat of butter, a drizzle of maple syrup, or a topping of fresh fruit, these fluffy pancakes are guaranteed to be a crowd-pleaser.
Keep these tips in mind, and you’ll soon be able to make the perfect fluffy pancakes every time. In the next section, we’ll share some tips for extra fluffiness and customization ideas to make this recipe your own!
Top Tips for Best Fluffy Pancakes for Breakfast
If you’re aiming for the ultimate fluffy pancakes, the recipe alone is just the start. To take your pancakes to the next level of fluffiness, here are some essential tips that will guarantee a light, airy texture every time. Let’s dive into the tricks that will make your pancakes even fluffier than you ever imagined.
Let the Batter Rest
One of the simplest yet most effective ways to ensure fluffy pancakes is to let your batter rest. After mixing the wet and dry ingredients, cover the bowl with a clean towel or plastic wrap and let it sit for 10-15 minutes. This resting time allows the flour to fully absorb the liquid and gives the gluten a chance to relax. As a result, your pancakes will be lighter and fluffier, without that dense, chewy texture that sometimes occurs when the batter is used immediately.
Use Room Temperature Ingredients
Another key to achieving fluffy pancakes is ensuring that your ingredients are at room temperature. Cold eggs, milk, and butter can cause the batter to seize up when mixed, leading to lumpy pancakes. Allowing your eggs and milk to sit out for about 30 minutes before using them can make a huge difference in the smoothness and consistency of the batter. When the ingredients blend seamlessly, you’ll get a much lighter, fluffier result in the pan.
Avoid Overmixing the Batter
We can’t stress this enough: don’t overmix your pancake batter! When you overwork the batter, you activate the gluten in the flour, which results in dense and tough pancakes. To ensure fluffy pancakes, simply mix the wet and dry ingredients until they are just combined—there should still be some lumps. A few lumps are perfectly fine; in fact, they help to keep the texture light and airy. If the batter is smooth, your pancakes won’t be as fluffy as they should be.
Use Fresh Baking Powder
If you want your fluffy pancakes to rise perfectly, it’s essential to use fresh baking powder. This leavening agent is what helps your pancakes puff up, and over time, it can lose its potency. Always check the expiration date on your baking powder and replace it if it’s been sitting in your pantry for too long. Fresh baking powder ensures that your pancakes rise properly and have that signature fluffiness that everyone loves.
By following these top tips, you’ll be able to make fluffy pancakes every single time. These small adjustments—letting the batter rest, using room temperature ingredients, avoiding overmixing, and using fresh baking powder—are simple but effective ways to elevate your pancake game. Get ready to flip those pancakes into a fluffy breakfast masterpiece!
How to Customize Your Fluffy Pancakes
One of the best things about fluffy pancakes is their versatility. You can easily tweak the recipe to fit your tastes or dietary needs, making them even more delightful. Whether you’re craving fruity, nutty, or vegan options, customizing your fluffy pancakes has never been easier. Let’s dive into some fun ways to make these pancakes your own!
Adding Fruits and Nuts
If you love a little extra texture and flavor in your pancakes, adding fruits and nuts is a great way to elevate your fluffy pancakes. Fresh berries like blueberries, raspberries, or strawberries can be folded directly into the batter or sprinkled on top. Bananas are another delicious choice—just slice them up and mix them into the pancake batter for a naturally sweet taste. For a crunchier bite, walnuts, pecans, or almonds can add a nutty flavor that pairs perfectly with the fluffy texture.
These additions not only enhance the flavor but also make your fluffy pancakes feel more indulgent and unique. Don’t be afraid to experiment with your favorite fruits or nuts to find the combo that works best for you!
Making Vegan Fluffy Pancakes
For those who follow a plant-based diet or have dairy and egg allergies, you can easily transform your fluffy pancakes into a vegan-friendly treat. To substitute eggs, try using flax eggs (1 tablespoon of ground flaxseed mixed with 3 tablespoons of water, left to sit for 5 minutes until it thickens). Instead of regular milk, opt for your favorite plant-based milk, such as almond, soy, or oat milk. Vegan butter or coconut oil can replace traditional butter, ensuring your pancakes remain rich and moist.
Even with these substitutions, your fluffy pancakes will be just as light and airy as the original recipe. They’re perfect for anyone wanting a delicious, dairy-free breakfast without sacrificing texture or taste.
Best Toppings for Fluffy Pancakes
Once you’ve mastered the art of making fluffy pancakes, the next step is to choose the perfect toppings to take them to the next level. Whether you prefer classic or creative options, the right toppings can transform a simple pancake breakfast into an indulgent treat. Let’s explore some of the best toppings for your fluffy pancakes!
Classic Toppings
For those who love simplicity, classic toppings are the way to go. Fluffy pancakes are the perfect base for traditional toppings like syrup, butter, and fresh fruit. The rich, golden sweetness of maple syrup adds a comforting touch, while a pat of butter will melt into your pancakes, making each bite soft and savory.
If you’re looking to add a little extra flavor, consider using honey or agave syrup as alternatives to maple syrup for a different sweetness profile. These options still complement the lightness of your fluffy pancakes without overpowering the natural flavors.
Creative Toppings
For those feeling adventurous, there are endless creative toppings that will elevate your fluffy pancakes to new heights. Fruit compote is a fantastic option—mixing fresh or frozen fruit with a bit of sugar and lemon juice on the stovetop creates a luscious sauce to drizzle over your pancakes. You can also top your fluffy pancakes with chocolate chips, which will melt into the warm batter, adding a rich sweetness to each bite.
If you’re a fan of texture contrast, adding whipped cream or a dollop of yogurt can provide a creamy balance to the fluffiness of the pancakes. Chopped nuts, such as pecans or almonds, bring a satisfying crunch, while a sprinkle of powdered sugar can make your pancakes look as good as they taste.
Best Toppings for Best Fluffy Pancakes
Once you’ve mastered the art of making fluffy pancakes, the next step is to choose the perfect toppings to take them to the next level. Whether you prefer classic or creative options, the right toppings can transform a simple pancake breakfast into an indulgent treat. Let’s explore some of the best toppings for your fluffy pancakes!
Classic Toppings
For those who love simplicity, classic toppings are the way to go. Fluffy pancakes are the perfect base for traditional toppings like syrup, butter, and fresh fruit. The rich, golden sweetness of maple syrup adds a comforting touch, while a pat of butter will melt into your pancakes, making each bite soft and savory.
If you’re looking to add a little extra flavor, consider using honey or agave syrup as alternatives to maple syrup for a different sweetness profile. These options still complement the lightness of your fluffy pancakes without overpowering the natural flavors.
Creative Toppings
For those feeling adventurous, there are endless creative toppings that will elevate your fluffy pancakes to new heights. Fruit compote is a fantastic option—mixing fresh or frozen fruit with a bit of sugar and lemon juice on the stovetop creates a luscious sauce to drizzle over your pancakes. You can also top your fluffy pancakes with chocolate chips, which will melt into the warm batter, adding a rich sweetness to each bite.
If you’re a fan of texture contrast, adding whipped cream or a dollop of yogurt can provide a creamy balance to the fluffiness of the pancakes. Chopped nuts, such as pecans or almonds, bring a satisfying crunch, while a sprinkle of powdered sugar can make your pancakes look as good as they taste.
There’s no doubt that a fluffy pancakes recipe is a must-have in every kitchen. With the right ingredients and simple techniques, you can create pancakes that are light, airy, and irresistible. From understanding the essential ingredients to mastering the cooking techniques and adding your creative twists, these tips will help you achieve the perfect stack every time.
By following this easy fluffy pancake recipe for breakfast, you’re guaranteed to enjoy a morning filled with warmth, comfort, and unbeatable flavor. Whether it’s a special weekend treat or a quick weekday indulgence, the Best Fluffy Pancakes for Breakfast are sure to delight everyone at the table. Don’t hesitate to experiment with toppings like fresh fruit, whipped cream, or maple syrup to elevate your pancakes even further.
If you’re looking for more inspiration, explore our best breakfast recipes for a variety of delicious ideas to complement your pancakes. For expert tips and techniques on mastering the perfect pancake texture, visit this comprehensive guide from a trusted culinary source: Pancake Cooking Techniques.
Frequently Asked Questions
How do you make Jamie Oliver fluffy pancakes?
To make Jamie Oliver’s fluffy pancakes, here’s a simple and delicious recipe inspired by his style: Ingredients: 1 cup (125g) plain flour 1 tablespoon baking powder 1 pinch of salt 1 tablespoon sugar (optional) 1 large egg 1 cup (250ml) milk 2 tablespoons melted butter or oil A dash of vanilla extract (optional) Instructions: Prepare the Dry Ingredients: In a large mixing bowl, sift together the flour, baking powder, salt, and sugar. Whisk the Wet Ingredients: In a separate bowl, crack the egg and whisk it with the milk, melted butter (or oil), and vanilla extract until smooth. Combine the Wet and Dry Ingredients: Make a well in the center of the dry ingredients and pour in the wet ingredients. Gently mix together until just combined. Be careful not to overmix—the batter should still have a few lumps for fluffy pancakes. Cook the Pancakes: Heat a non-stick frying pan or griddle over medium heat. Lightly grease with butter or oil. For each pancake, pour a small amount of batter onto the pan. Cook for about 1-2 minutes, or until bubbles start to form on the surface, then flip and cook for another minute or until golden brown. Serve: Stack the pancakes on a plate and serve with your favorite toppings, such as maple syrup, fresh berries, whipped cream, or yogurt. Enjoy these fluffy pancakes that are sure to be a hit with family and friends, just like Jamie Oliver’s style of simple, flavorful cooking!
What is the trick to making pancakes fluffy?
Here’s the answer in bullet points for the FAQ section: Use fresh baking powder Don’t overmix the batter Let the batter rest for 5-10 minutes Cook on medium-low heat Avoid pressing the pancakes while cooking
What causes pancakes to be fluffy?
Here’s the answer in bullet points for the FAQ section: Leavening agents like baking powder or baking soda create air bubbles in the batter, making pancakes rise. Air incorporated into the batter during mixing, especially when whisking wet ingredients, helps achieve a light texture. Resting the batter allows the flour to absorb liquids and activate the leavening agents, improving fluffiness. Gentle mixing prevents overdeveloping gluten, which keeps the pancakes tender and fluffy.
Looking for a delicious and healthy way to start your day? The Best Double Apple Baked Oatmeal is the perfect solution. Combining the sweetness of apples with hearty oats, this dish offers a warm, satisfying, nutritious, and flavorful breakfast. The Best Double Apple Baked Oatmeal tastes amazing and provides essential fiber, vitamins, and antioxidants, making it a great choice for a balanced start to your day.
Whether you need a quick breakfast or a meal prep option, the Best Double Apple Baked Oatmeal is the answer. Easy to make and flavorful, this dish will quickly become a morning staple. Let’s explore why the Best Double Apple Baked Oatmeal is the perfect recipe for busy mornings!
Quick Links
Why Double Apple Baked Oatmeal?
the best Health Benefits of Apples
best Double Apple Baked Oatmeal is not just a delicious breakfast—it’s also packed with health benefits. Apples, a key ingredient in this recipe, are loaded with fiber, antioxidants, and vitamins. Rich in soluble fiber, apples help to promote healthy digestion and keep you feeling full longer, making them a great option for weight management. Plus, the antioxidants in apples help combat inflammation and support heart health. The natural sweetness of apples adds flavor without the need for excessive sugar, making Double Apple Baked Oatmeal a wholesome choice for any meal.
The Appeal of Baked Oatmeal
When it comes to convenience and nutrition, baked oatmeal is hard to beat. Double Apple Baked Oatmeal is a one-pan wonder that can be prepared ahead of time, making it perfect for meal prepping. If you’re someone who enjoys a warm breakfast but doesn’t have time to cook every morning, this recipe is a game-changer. Not only does it save you time, but it also offers a delicious way to enjoy oats, which are known for their heart-healthy benefits. You can read more about the benefits of oats in our article on Healthy Oatmeal Recipes.
Baked oatmeal like this is also highly customizable. You can experiment with different fruits, spices, and mix-ins, but the combination of apples and oats in this Double Apple Baked Oatmeal is the perfect balance of flavor and texture. Whether you’re prepping for a busy week or simply want a cozy, nutritious breakfast, Double Apple Baked Oatmeal is the answer.
This versatile dish not only satisfies your taste buds but also helps fuel your day, making it a breakfast choice you’ll want to revisit again and again.
Key Ingredients for best Double Apple Baked Oatmeal
Oats: The Heart of the Recipe
The base of any good baked oatmeal recipe is, of course, oats. For Double Apple Baked Oatmeal, rolled oats are the star ingredient. These oats provide a hearty texture and a dose of fiber that makes this breakfast both filling and nutritious. Oats are known for their ability to lower cholesterol, support heart health, and regulate blood sugar levels, making them a perfect addition to a balanced diet. Whether you’re baking this dish for yourself or the whole family, oats ensure that every bite of Double Apple Baked Oatmeal is both satisfying and nourishing.
Apples: The Double Apple Twist
What sets Double Apple Baked Oatmeal apart from other oatmeal recipes is the use of two different types of apples. We recommend a mix of tart Granny Smith apples and sweet Honeycrisp apples to create a well-rounded flavor profile. Granny Smith apples offer a tangy bite that contrasts beautifully with the sweetness of Honeycrisp apples, creating a balanced, flavorful dish. Apples are packed with vitamin C, fiber, and antioxidants, making them not only delicious but also incredibly beneficial for your health. This combination of apples in your oatmeal ensures each bite is juicy, flavorful, and full of nutrients.
Other Key Ingredients
In addition to oats and apples, several other key ingredients bring this double-apple baked Oatmeal to life. Eggs provide structure and moisture, ensuring the oatmeal bakes to a perfect consistency. Milk (or a dairy-free alternative, like almond milk) adds richness and creaminess, making the oatmeal extra comforting. A touch of cinnamon adds warmth and spice, complementing the apples’ sweetness. Vanilla enhances the overall flavor profile, while a drizzle of honey sweetens the dish naturally without overpowering the flavors. These ingredients come together to create a dish that’s not only nutritious but also irresistibly delicious.
Each of these ingredients plays a vital role in making Double Apple Baked Oatmeal a wholesome, satisfying breakfast. Whether you’re enjoying it fresh out of the oven or reheating leftovers, the balance of flavors and textures in this recipe is sure to please.
How to Make the Best Double Apple Baked Oatmeal
Step-by-Step Instructions
Creating Double Apple Baked Oatmeal is simple, even for those who don’t consider themselves expert bakers. Here’s how to bring this delicious breakfast to life:
Prep Your Ingredients: Start by preheating your oven to 375°F and greasing a baking dish with butter or nonstick spray. Peel, core, and dice one tart apple (like Granny Smith) and one sweet apple (such as Honeycrisp). Set the apples aside and gather the remaining ingredients, like rolled oats, milk, eggs, honey, cinnamon, and vanilla extract.
Mix the Dry Ingredients: In a large bowl, combine the rolled oats, cinnamon, and a pinch of salt. Stir everything together to ensure the cinnamon is evenly distributed, as this will give your Double Apple Baked Oatmeal its warm, spiced flavor.
Prepare the Wet Mixture: In a separate bowl, whisk together the milk, eggs, honey, and vanilla extract. This combination adds richness and binds the oatmeal while balancing sweetness with natural flavors.
Combine Everything: Pour the wet mixture into the bowl with the oats and stir to combine. Carefully incorporate the chopped apples, spreading them evenly throughout the mixture to ensure every bite is packed with flavor. The double apple addition is what makes this recipe shine, so make sure each bite gets its fair share!
Bake to Perfection: Pour the mixture into your greased baking dish, smoothing it into an even layer. Place it in the preheated oven and bake for 35–40 minutes, or until the top turns golden and the oatmeal is firm to the touch. You’ll know it’s ready when a toothpick inserted in the center comes out clean.
Tips and Tricks for Customization
Double Apple Baked Oatmeal is versatile, so feel free to tweak it to your taste:
Dietary Preferences: Swap out dairy milk for almond or oat milk, or use a flax egg for a plant-based version.
Extra Add-Ins: Toss in chopped walnuts, raisins, or shredded coconut for added texture and flavor.
Sweeter Touch: If you prefer a sweeter oatmeal, drizzle maple syrup over the top before serving.
This recipe is as flexible as it is delicious, allowing you to make it your own while keeping the focus on the double apple goodness.
With its rich flavors and easy preparation, Double Apple Baked Oatmeal is a dish that anyone can enjoy. Whether it’s for meal prep or a weekend treat, you’ll love how simple and satisfying this recipe is to make.
Serving Ideas for best Double Apple Baked Oatmeal
Serving Suggestions
Double Apple Baked Oatmeal is as versatile as it is delicious, making it easy to serve in a variety of ways. For a simple, satisfying breakfast, enjoy a warm slice straight out of the oven. Want to elevate the experience? Try these delicious serving ideas:
For a creamy upgrade, top your slice with a spoonful of Greek yogurt to enhance the richness and add a protein-packed touch. The tangy flavor pairs beautifully with the sweet and tart apples in the oatmeal.
Drizzle of Sweetness: Drizzle maple syrup or a spoonful of honey over the oatmeal for added sweetness and shine.
Crunchy Toppings: Sprinkle some granola, chopped nuts, or toasted coconut flakes for a delightful crunch and extra texture.
Each serving idea brings a unique twist to your Double Apple Baked Oatmeal, making it a breakfast option you’ll never tire of.
Storage and Meal Prep Tips
One of the best things about Double Apple Baked Oatmeal is how well it stores, making it a dream for meal prep enthusiasts. Here’s how to keep it fresh and delicious all week:
Refrigerate Leftovers: Once cooled, store leftover oatmeal in an airtight container in the refrigerator. It can remain fresh and flavorful for up to five days.
Reheating Made Easy: For a quick breakfast, simply reheat a portion in the microwave for 30–60 seconds or warm it in the oven at 350°F until heated through.
Freeze for Later: If you’re prepping for the long term, freeze individual portions in airtight containers or freezer-safe bags. When ready to enjoy, thaw overnight in the fridge and reheat as usual.
By planning, you can enjoy the comforting flavors of best Double Apple Baked Oatmeal any day of the week without extra effort.
The Perfect Breakfast for Any Occasion
Whether you’re serving it fresh, reheating leftovers, or customizing it with your favorite toppings, Double Apple Baked Oatmeal offers endless possibilities for a satisfying breakfast. With its combination of wholesome ingredients and adaptable serving options, it’s sure to become a favorite in your kitchen.
In conclusion, the Best Double Apple Baked Oatmeal is the perfect way to start your day on a wholesome and delicious note. Packed with nutritious apples and hearty oats, this dish offers a satisfying and flavorful breakfast that’s both easy to make and versatile. Whether enjoyed fresh from the oven or as part of your meal prep, the Best Double Apple Baked Oatmeal is sure to become a favorite in your morning routine. Check out our Breakfast Ideas for more delicious and healthy breakfast options!
Not only is it a healthy option, but the Best Double Apple Baked Oatmeal can be customized to suit your tastes and preferences, making it a dish the whole family can enjoy. So, why not try the Best Double Apple Baked Oatmeal today and enjoy a delicious, nutritious start to your day?
FAQ Section
Are oatmeal and apples good for you?
Yes, oatmeal and apples are both nutritious. Oatmeal is high in fiber, which supports digestion and helps keep you full, while apples provide essential vitamins, fiber, and antioxidants, making them a healthy combination.
Why aren’t my baked oats fluffy?
If your baked oats aren’t turning out fluffy, there are a few possible reasons: Too much liquid: Adding too much milk or water can make the oats too dense. Ensure you’re following the correct ratio of oats to liquid. Overmixing: Stirring the mixture too much can cause the oats to become dense. Mix just enough to combine the ingredients. Underbaking: Make sure you bake them for the right amount of time. Underbaking can result in a wet, dense texture. Oven temperature: If the oven isn’t hot enough, the oats may not rise as expected. Preheat your oven properly to ensure an even bake. Type of oats: Rolled oats or old-fashioned oats work best for fluffy baked oats. Instant oats might result in a denser texture. Adjusting these factors can help your baked oats turn out fluffier next time!
How to make oatmeal more delicious?
To make oatmeal more delicious, here are some easy ways to elevate its flavor: Add Fresh or Dried Fruit: Apples, bananas, berries, or dried fruits like raisins or cranberries add natural sweetness and flavor. Sweeteners: Add honey, maple syrup, or agave for extra sweetness. You can also use a sprinkle of brown sugar or coconut sugar. Spices: Add a pinch of cinnamon, nutmeg, or vanilla extract for a warm, comforting flavor. Nut Butter: Stir in peanut butter, almond butter, or cashew butter for richness and a creamy texture. Nuts and Seeds: Sprinkle almonds, walnuts, chia seeds, or flax seeds for added crunch and nutrition. Yogurt or Milk: Use milk (dairy or plant-based) instead of water for creamier oatmeal, or top with a dollop of yogurt for extra richness. Chocolate or Cocoa: For a chocolatey twist, add dark chocolate chips, cocoa powder, or even a scoop of protein powder. Coconut: Shredded coconut or coconut milk adds a tropical flair and extra creaminess. Granola or Crispy Toppings: A crunchy topping like granola or toasted coconut can add texture to your oatmeal. Savory Additions: If you prefer savory oatmeal, try adding avocado, sautéed vegetables, a poached egg, or cheese for a hearty breakfast. Experimenting with these additions can take your oatmeal from basic to mouthwatering!
Why is my baked oatmeal gummy?
If your baked oatmeal turns out gummy, it could be due to one or more of the following reasons: Too Much Liquid: Adding excess liquid to the oats can result in a gummy texture. Make sure you’re following the recipe’s liquid-to-oat ratio carefully. If you find the mixture too watery, reduce the liquid slightly. Not Enough Baking Time: If baked oatmeal isn’t cooked long enough, it can retain a moist, undercooked texture. Be sure to bake it for the full recommended time, and check for doneness by inserting a toothpick or knife in the center; it should come out clean when done. Overmixing the Oats: Mixing the oats too much can cause them to become overly soft and mushy. Stir the ingredients gently to avoid breaking the oats. Too Many Wet Ingredients: Adding too many wet ingredients (like mashed bananas, yogurt, or applesauce) can result in a heavier, denser texture. Adjust the quantities to avoid making the mixture too wet. Type of Oats: The type of oats you’re using can affect the texture. Steel-cut oats, for example, require more liquid and longer cooking times compared to rolled oats, which absorb liquid more easily and bake up fluffier. To avoid a gummy result, focus on balancing the liquid and oats, and make sure your baking time and temperature are correct!
How do you fix gluey oatmeal?
To fix gluey oatmeal, here are a few helpful tips: Add More Liquid: If your oatmeal is too thick or gluey, simply add more liquid (water, milk, or a dairy alternative) to loosen it up. Gradually stir in small amounts of liquid until the desired consistency is reached. Reduce Heat: Cook your oatmeal on low heat instead of high heat. Cooking at too high a temperature can cause the oats to stick together and become gluey. Stir occasionally to ensure it cooks evenly and doesn’t stick to the bottom of the pot. Stir Less: Stirring too much while cooking can cause the oats to break down and become mushy or gluey. Try to stir only occasionally to allow the oats to cook properly without becoming overworked. Use Rolled Oats: If you’re using steel-cut oats or instant oats, try switching to rolled oats, which have a better texture for oatmeal that isn’t too sticky or gluey. Check the Oat-to-Liquid Ratio: If you added too many oats relative to the liquid, the result can be gluey oatmeal. For a more balanced texture, use 1/2 cup of oats to 1 cup of liquid, and adjust based on your preference. With these adjustments, you should be able to fix gluey oatmeal and enjoy a smooth, creamy bowl!
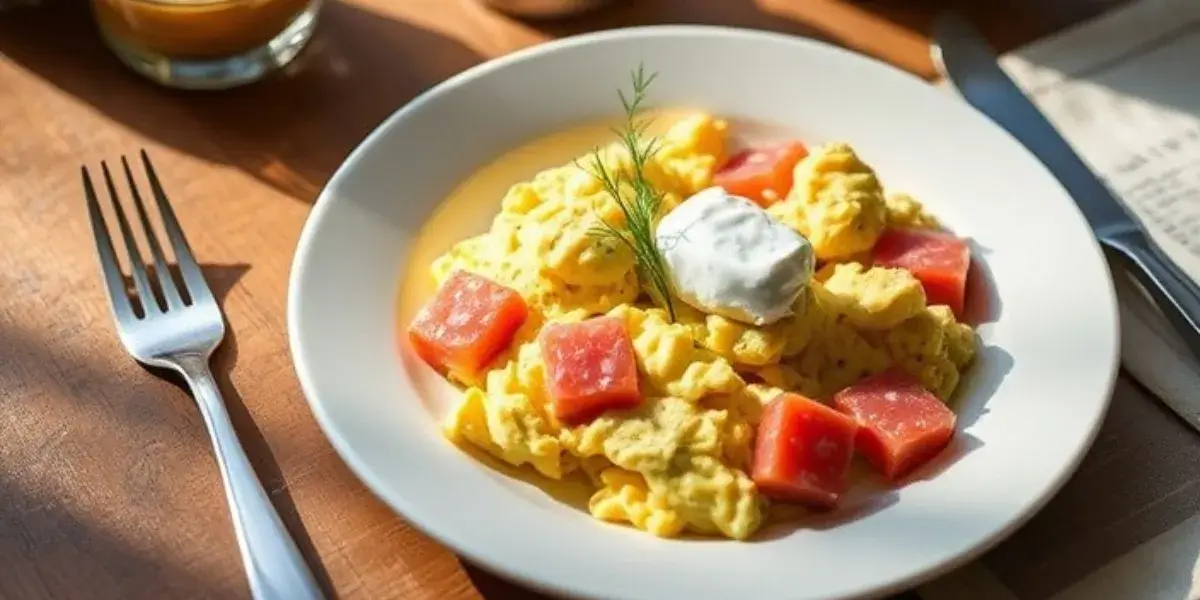
Start your day with a delightful twist on a classic breakfast with this Easy Scrambled Eggs with Smoked Trout and Crème Fraîche recipe. Combining the creamy richness of crème fraîche with the smoky depth of trout, this dish transforms your scrambled eggs into something truly special. Whether you’re looking for a quick, satisfying meal or a nutritious start to your morning, this Easy Scrambled Eggs with Smoked Trout and Crème Fraîche recipe is the perfect choice. For an added health boost, this easy healthy scrambled eggs recipe offers a balanced and delicious way to enjoy your eggs, making it a must-try for any breakfast lover.
Table of Contents
What You'll Find in This Guide
Why Smoked Trout and Crème Fraîche recipe?
Smoked Trout: A Flavorful Twist on Classic Scrambled Eggs
One of the standout ingredients in scrambled eggs with smoked trout and crème fraîche is the smoked trout itself. The addition of smoked trout takes your standard scrambled eggs from basic to extraordinary. The trout’s smokiness brings a layer of depth to the dish that pairs perfectly with the delicate texture of scrambled eggs. With its subtle yet rich flavor, smoked trout offers a gourmet touch that elevates this dish, making it feel as though you’ve stepped into a high-end brunch spot—right in your kitchen.
Not only does smoked trout enhance the taste, but it also provides a great source of protein and omega-3 fatty acids. These healthy fats contribute to heart health and offer numerous benefits, making your meal both delicious and nutritious. Whether you’re a seafood lover or a novice, smoked trout in scrambled eggs is a game-changer that adds both complexity and health benefits to your breakfast or brunch.
Crème Fraîche: The Secret to Creamy, Luxurious Scrambled Eggs
The second key ingredient in scrambled eggs with smoked trout and crème fraîche is the crème fraîche. Known for its rich, slightly tangy flavor, crème fraîche is the perfect complement to the savory smoked trout. It gives the scrambled eggs an ultra-creamy texture that makes every bite feel decadent. Unlike sour cream, which can be tangy and thick, crème fraîche adds a smooth, luxurious finish to scrambled eggs without overpowering the dish.
Incorporating crème fraîche into your scrambled eggs also ensures they remain soft and moist, creating the ideal scramble. This addition transforms ordinary eggs into a sophisticated dish, making them taste more indulgent and restaurant-quality. The creamy consistency of crème fraîche combines with the smoked trout to create an unforgettable balance of flavors that you’ll crave again and again.
A Perfect Pairing for a Gourmet Breakfast
When you combine smoked trout and crème fraîche with scrambled eggs, you’re creating an experience. The smoky, savory, and creamy elements make this dish irresistible. It’s a perfect go-to brunch option. Not only is it a treat for your taste buds, but it’s also an easy way to impress guests or enjoy a luxurious meal at home.
As you try this recipe, you’ll see why smoked trout and crème fraîche are essential in scrambled eggs, bringing out the best in each other for a unique twist on a classic dish.
Key Ingredients and Their Role
Scrambled Eggs: The Base of a Perfect Dish
At the heart of easy scrambled eggs with smoked trout and crème fraîche lies the scrambled eggs themselves. They may seem simple, but the quality of the eggs you use plays a crucial role in achieving the perfect texture and flavor. Fresh, high-quality eggs are essential for a creamy, fluffy scramble that complements the rich smoked trout and crème fraîche. When making scrambled eggs, it’s all about balance—using eggs that are fresh and free-range can make a noticeable difference in both taste and texture.
To make the perfect scrambled eggs, be sure to whisk them well before cooking. This helps incorporate air into the eggs, resulting in a soft, tender consistency when cooked. Cooking them over low heat and stirring gently ensures they don’t become overcooked or rubbery, creating a smooth and velvety base for your easy scrambled eggs with smoked trout and crème fraîche.
Smoked Trout: A Gourmet Addition
Smoked trout is the ingredient that truly sets scrambled eggs with smoked trout and crème fraîche apart from ordinary scrambled eggs. It brings an element of sophistication with its subtle smokiness, which enhances the dish without overwhelming it. The delicate flavor of smoked trout pairs beautifully with the creamy scrambled eggs, creating a savory, flavorful bite in every spoonful.
When selecting smoked trout, opt for a high-quality product that’s freshly smoked. Whether you buy it pre-sliced or whole, make sure it has a clean, smoky aroma and isn’t overly dry. Smoked trout adds not only flavor but also nutrition to the dish, as it’s packed with healthy omega-3 fatty acids and protein. This makes it a great option for those looking to enjoy a breakfast that’s both indulgent and nourishing.
Crème Fraîche: The Creamy, Tangy Finish
No dish is complete without the perfect finishing touch, and in scrambled eggs with smoked trout and crème fraîche, that touch is the crème fraîche. Known for its smooth, silky texture and slightly tangy flavor, crème fraîche adds a level of richness and complexity that enhances the other ingredients. It’s the secret to achieving that luscious, creamy consistency in the scrambled eggs, making each bite feel luxurious.
Unlike sour cream, crème fraîche has a gentler, milder tang and a thicker consistency, which makes it ideal for cooking. When you fold it into the scrambled eggs, it not only enriches the flavor but also prevents the eggs from drying out. Crème fraîche is a key ingredient in this recipe, providing the perfect balance to the smoked trout’s bold flavors and bringing the dish together in a way that’s simply irresistible.
Choosing the Right Ingredients for the Best Results
The quality of ingredients is key to perfect scrambled eggs with smoked trout and crème fraîche. Fresh eggs, high-quality smoked trout, and rich crème fraîche are essential for a flavorful, creamy, and indulgent dish. By selecting the right ingredients, you’re elevating this classic breakfast into something special, ensuring a gourmet experience with every bite.
Table of Ingredients for easy Scrambled Eggs with Smoked Trout and Crème Fraîche
Ingredient
Role in the Recipe
Notes
Eggs
The base of the dish; provides the creamy, fluffy texture in the scramble
Use fresh, high-quality eggs for best results
Smoked Trout
Adds smokiness and depth to the dish, transforming the eggs into a gourmet experience
Choose fresh, high-quality smoked trout for optimal flavor
Crème Fraîche
Adds creaminess and a mild tang; making the scrambled eggs rich and velvety
Use full-fat crème fraîche for the best texture and flavor
Butter or Olive Oil
For cooking the scrambled eggs, ensure they remain soft and smooth
Butter adds richness, but olive oil can be used as\ a lighter option
Salt and Pepper
Basic seasonings to enhance flavor
Adjust to taste, but don’t over-season as smoked trout already adds flavor
Fresh Herbs (Optional)
For garnish and added flavor; dill, chives, or parsley work well
Fresh herbs provide a refreshing contrast to the richness of the dish
This table summarizes the key ingredients and their roles in the recipe, providing a helpful overview for readers.
Step-by-Step for easy Scrambled Eggs with Smoked Trout and Crème Fraîche
Ingredients for Scrambled Eggs with Smoked Trout and Crème Fraîche
To get started on making scrambled eggs with smoked trout and crème fraîche, gather the following ingredients:
1 tablespoon unsalted butter or olive oil (for cooking)
Salt and freshly ground black pepper, to taste
Fresh herbs (optional, such as dill or chives) for garnish
This combination of fresh ingredients will ensure a dish that’s both delicious and nutritious, with the right balance of creamy and smoky flavors.
Instructions for Scrambled Eggs with Smoked Trout and Crème Fraîche
Prepare the Ingredients
Start by cracking the eggs into a bowl. Whisk them well with a fork or whisk until the yolks and whites are fully incorporated. This helps incorporate air into the eggs, ensuring a light and fluffy texture when cooked. Season with a pinch of salt and a dash of pepper, then set aside. Pro Tip: If you want extra creamy scrambled eggs, add a tablespoon of water or milk to the eggs before whisking.
Cook the Smoked Trout
Heat a non-stick skillet over medium heat. Add the butter or olive oil and let it melt. Once the butter is bubbling (but not browning), add the smoked trout and sauté for about 1-2 minutes, just to warm it up. You’re not cooking the trout, just giving it a little heat to enhance its smoky flavor. Remove from the skillet and set aside. Pro Tip: If you like your trout slightly crisped, you can cook it for an additional minute, but be careful not to overdo it.
In the same skillet, reduce the heat to low to prevent the eggs from overcooking. Pour in the whisked eggs. Gently stir with a spatula, making sure to move the eggs from the edges toward the center. Continue this motion, allowing the eggs to cook slowly. This technique ensures soft, creamy scrambled eggs. Pro Tip: Resist the urge to turn up the heat. Low and slow is key for the perfect scramble!
Add Crème Fraîche
When the eggs are almost cooked but still slightly runny, add in the crème fraîche. Stir it gently into the eggs, allowing it to melt and create a creamy, rich texture. The eggs should now be soft, fluffy, and coated in the luxurious crème fraîche. Pro Tip: Crème fraîche should be added towards the end of cooking to maintain its smooth, velvety consistency.
Combine Smoked Trout and Eggs
Once the scrambled eggs are perfectly cooked and creamy, gently fold in the warm smoked trout. Make sure the trout is evenly distributed throughout the eggs, allowing the smokiness to infuse the dish. Pro Tip: Don’t overmix! You want the eggs and trout to stay tender and distinct.
Garnish and Serve
Transfer the scrambled eggs with smoked trout and crème fraîche to serving plates. Garnish with fresh herbs like dill or chives for a burst of color and added freshness. Serve immediately, paired with toast or a light salad if desired. Pro Tip: Fresh herbs add a delightful contrast to the richness of the dish and make it look even more appetizing.
Enjoy Your Gourmet Scrambled Eggs!
This easy, step-by-step recipe will transform your usual scrambled eggs into a decadent treat that’s sure to impress. With the right balance of smoky trout and creamy crème fraîche, every bite of your scrambled eggs with smoked trout and crème fraîche will feel like a special occasion. Enjoy this dish for brunch, breakfast, or whenever you want to indulge in something truly delicious.
Tips for Customizing Your Dish
Try Different Types of Fish
While scrambled eggs with smoked trout and crème fraîche is a fantastic combination, you can switch things up by using different types of smoked fish. Smoked salmon is a classic alternative that will add a rich, buttery flavor to your scrambled eggs. For a more adventurous twist, consider using smoked mackerel or even smoked haddock. Each type of fish offers a unique smokiness that will enhance your dish in its own way.
If you’re in the mood for something a bit lighter, you could also try using smoked whitefish, which has a more delicate flavor that won’t overpower the eggs and crème fraîche. This flexibility allows you to tailor your dish based on personal preference or what’s available at your local market.
Adjust the Level of Creaminess
One of the best things about scrambled eggs with smoked trout and crème fraîche is the creamy, indulgent texture. But if you’re looking to customize the richness, feel free to adjust the amount of crème fraîche you use. If you want a lighter version, reduce the crème fraîche slightly or substitute it with Greek yogurt for a tangy twist that still maintains creaminess without the added fat.
Alternatively, for an even richer dish, you could add a small dollop of mascarpone cheese or sour cream along with the crème fraîche. These additions will elevate the texture and flavor, making your scrambled eggs even more decadent.
Add Fresh Vegetables or Greens
For those looking to add a fresh element to their scrambled eggs with smoked trout and crème fraîche, consider folding in sautéed vegetables or fresh greens. Spinach, kale, or arugula can complement the rich eggs and smoked trout, adding a burst of color and a subtle peppery flavor that balances the dish.
You could also include some finely chopped tomatoes or avocado for a creamy, refreshing contrast. These additions not only bring more texture to the dish but also provide a nutritional boost, making it a heartier and more well-rounded meal.
Spice It Up with Seasonings
For a bit of extra flavor in your scrambled eggs with smoked trout and crème fraîche, don’t be afraid to get creative with your seasonings. If you love heat, a pinch of red pepper flakes or a drizzle of hot sauce can add a kick to the dish. You could also sprinkle in a little smoked paprika or fresh black pepper to enhance the smoky flavors of the trout.
Alternatively, fresh herbs like tarragon, basil, or parsley can bring a fragrant, refreshing note to your scrambled eggs. A squeeze of lemon juice or a zest of lemon rind can also bring out the natural flavors of the smoked trout, making your dish even more vibrant and flavorful.
Serve with a Twist
While scrambled eggs with smoked trout and crème fraîche are often served on their own or with a slice of toasted bread, there are plenty of ways to customize how you serve this dish. For a low-carb alternative, serve your scrambled eggs over a bed of sautéed greens or on top of a cauliflower mash. If you prefer a more substantial dish, pair it with a hearty grain like quinoa or farro.
For a truly indulgent brunch experience, you could serve your scrambled eggs alongside roasted potatoes or even a fresh croissant for a more European-style presentation.
Make It Your Own
Ultimately, scrambled eggs with smoked trout and crème fraîche can be tailored to suit any taste. Whether you opt for a different type of fish, add extra vegetables, or adjust the level of creaminess, there are countless ways to make this dish your own. The best part is that it’s versatile enough to work for any occasion, from a casual breakfast at home to an elegant brunch with friends. Don’t be afraid to get creative and experiment with new flavors, textures, and garnishes—you’ll end up with a unique dish that’s perfectly suited to your tastes.
Common Mistakes to Avoid
Overcooking Eggs
One of the biggest pitfalls when making scrambled eggs with smoked trout and crème fraîche is overcooking the eggs. The secret to creamy, soft scrambled eggs is low, slow heat. Cooking them too quickly or at too high a temperature leads to a dry, rubbery texture that can ruin the dish.
To ensure the perfect scramble, cook the eggs on low heat, stirring gently and continuously. It’s essential to remove them from the pan just before they are fully set, as they will continue cooking in the residual heat. Aim for a soft, creamy consistency that allows the eggs to meld seamlessly with the smoked trout and crème fraîche.
Pro Tip: Low heat and patience are your best friends when making scrambled eggs. Rushing the process will result in a less-than-ideal texture.
Too Much Crème Fraîche
While crème fraîche is a key ingredient in this dish, adding too much can overwhelm the other flavors. Scrambled eggs with smoked trout and crème fraîche rely on a delicate balance—crème fraîche should enhance the eggs, not overpower them. If you add too much, the eggs may become too heavy and lose their light, fluffy texture.
Start with a small amount, and then taste and adjust as needed. A tablespoon or two is typically enough to create a luxurious, creamy finish without taking away from the smoky richness of the trout.
Pro Tip: A little goes a long way. Add crème fraîche gradually to ensure it doesn’t overpower the eggs.
Tough Smoked Trout
Another mistake to avoid is cooking or storing smoked trout improperly. Scrambled eggs with smoked trout and crème fraîche rely on the delicate texture and flavor of the trout, so it’s important to handle it with care. Overcooking the trout or storing it incorrectly can lead to dry, tough fish that won’t meld well with the eggs.
When cooking smoked trout, only warm it through gently—don’t cook it further. Store smoked trout in the refrigerator and use it within a few days of purchase for the best flavor and texture.
Pro Tip: Treat smoked trout with respect. Gently warm it before incorporating it into your scrambled eggs to preserve its tenderness.
In conclusion, this Easy Scrambled Eggs with Smoked Trout and Crème Fraîche recipe offers a perfect blend of flavors that will elevate your breakfast or brunch. The easy healthy scrambled eggs recipe is not only quick and simple but also adds a touch of gourmet with the creamy texture of crème fraîche and the smoky richness of trout. Whether you’re looking for a nutritious start to your day or a special treat, the Easy Scrambled Eggs with Smoked Trout and Crème Fraîche is sure to become a new favorite in your kitchen.
Plus, for a deeper dive into the nutritional benefits of trout, check out The Benefits of Eating Trout and learn why this flavorful fish is a great addition to your diet.
FAQ SECTION
Can I use smoked trout instead of smoked salmon?
Yes, you can use smoked trout instead of smoked salmon. Both have a similar texture and smoky flavor, but smoked trout tends to be milder and less oily than smoked salmon. It will still work well in recipes that call for smoked salmon, such as scrambled eggs, pasta, or salads. Just keep in mind that the flavor profile may be slightly different, but the dish will still be delicious!
How to make scrambled eggs without browning?
To make scrambled eggs without browning, follow these tips: Use Low to Medium Heat: Cook the eggs over low to medium heat instead of high heat. High heat can cause the eggs to cook too quickly and brown. Constant Stirring: Stir the eggs gently and continuously while they cook. This helps them cook evenly without sticking to the pan or getting too brown. Use Fresh Eggs: Fresh eggs tend to cook more smoothly and evenly, reducing the chances of browning. Add a Liquid: You can add a splash of milk, cream, or water to your eggs before cooking. This will help create a creamy texture and prevent them from browning. Use Non-Stick Cookware: A non-stick pan makes it easier to cook scrambled eggs without them sticking or turning brown. Avoid Overcooking: Remove the eggs from the heat as soon as they are set but still slightly creamy. Overcooking can lead to dry and browned eggs. By following these tips, you can achieve smooth, creamy scrambled eggs without any browning!
Why are restaurant scrambled eggs so fluffy?
Restaurant scrambled eggs are often fluffier than homemade ones due to several key techniques and ingredients used. Here’s why: Low and Slow Cooking: Restaurants tend to cook scrambled eggs on low heat, allowing them to cook more slowly and evenly, which results in a creamier texture. This also helps avoid overcooking, which can make eggs dry or rubbery. Whisking Eggs Thoroughly: In restaurants, eggs are often whisked very well, incorporating air into the mixture. This extra air helps make the eggs fluffier when cooked. Adding Liquid: Many restaurants add a small amount of liquid—such as milk, cream, or even water—into the egg mixture. This helps create a smoother, fluffier texture by making the eggs less dense. Use of Butter or Oil: A generous amount of butter or oil is often used for cooking, contributing to the creamy texture of the eggs. The fat also helps prevent the eggs from sticking and drying out. Cooking in Small Batches: In professional kitchens, eggs are often cooked in small batches rather than all at once. This ensures that each egg is cooked evenly and stays soft and fluffy. Constant Stirring: Chefs frequently stir the eggs gently while cooking, ensuring they cook evenly and maintain a light, fluffy texture without forming large curds. Freshness of Ingredients: Fresh eggs are a key factor in the fluffiness of scrambled eggs. Fresher eggs tend to have more moisture and a better texture when cooked. These factors combined result in scrambled eggs that are much fluffier, creamier, and smoother than those often made at home.